- Continue Shopping
- Your Cart is Empty


How To: Installing Sram Eagle DUB Crankset and Bottom Bracket
Words by: Max Morgan
When SRAM's new DUB bottom bracket platform was introduced, it definitely raised some eyebrows and had people thinking, "Really, another bottom bracket standard?" Yes it's true, the SRAM DUB system uses a new spindle size but the good thing is, SRAM makes a DUB bottom bracket to fit just about any bike out there. The DUB bottom bracket comes in BSA threaded, PressFit92, BB30, and PressFit30. The SRAM DUB cranksets feature a 28.99 mm spindle diameter and are utilized across the whole lineup of SRAM cranks: XX1 Eagle, XO1 Eagle, GX Eagle, NX Eagle, Descendant, and Stylo.
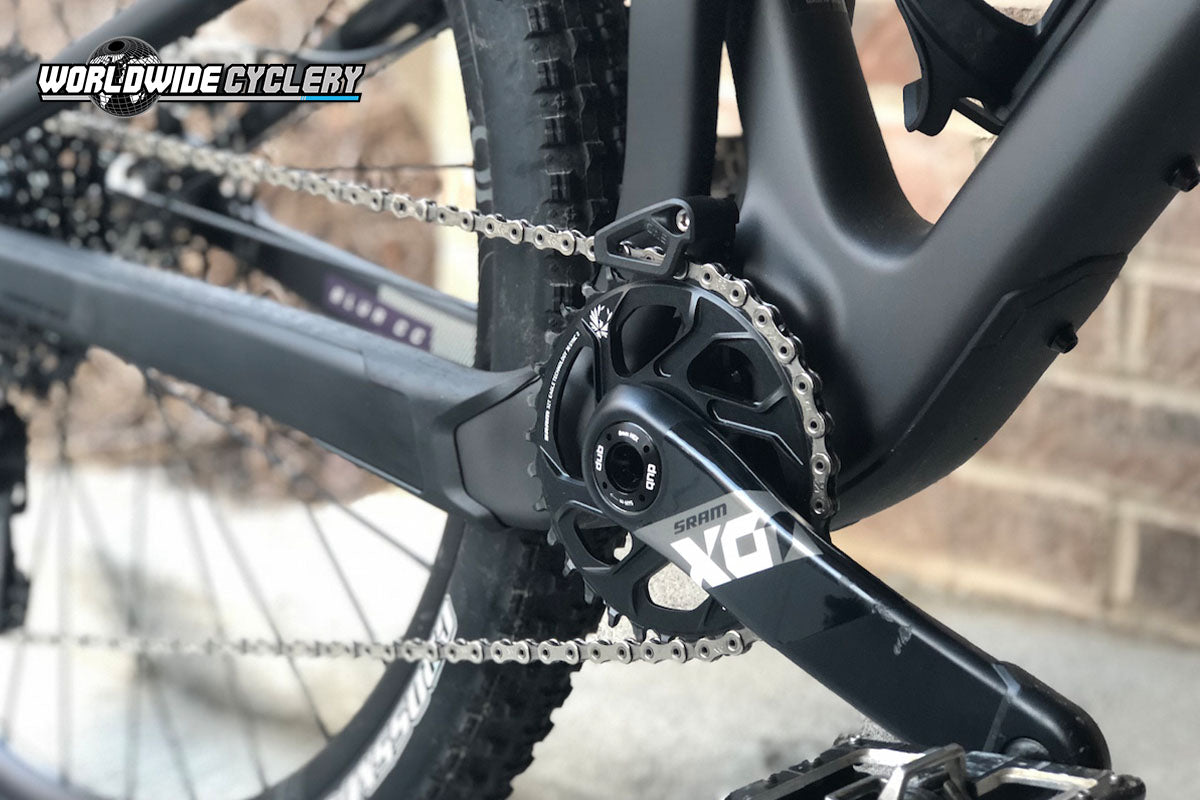
In this MTB How To, we are installing a SRAM XO1 Eagle DUB Crankset and SRAM DUB BSA Threaded Bottom Bracket. Follow these five simple steps to get your bottom bracket and crankset mounted properly and running smoothly! Also, if you're curious if SRAM Eagle will work on your bike, then check out this video!
What Tools Do We Need?
- Allen wrench set. You will need an 8mm allen wrench to thread the drive side crank arm on to the crank spindle. A 2mm allen wrench will be used to tighten the spindle preload adjuster. A 4mm allen wrench will be used to adjust the chainguide around the chainring.
- 12 point bottom bracket tool. The Sram DUB threaded bottom bracket uses a 12 point tool. We will be using a RaceFace Cinch Bottom Bracket Wrench in this demo, but using a Park Tool BBT-79 Bottom Bracket Tool is recommended. If you are using a BB30 or PressFit bottom bracket, a Park Tool HHP bottom bracket press will be the best way to press those bearings in safely.
- Grease. It very important to apply grease in the right places during this installation. We will be using Maxima Waterproof Grease.
- Rubber mallet. You may need to use a rubber mallet while installing the drive side crank to make sure the preload adjuster functions properly.
- Shop towels. Use a rag or shop towel to clean up and wipe off any excess grease.


1. Installing The Bottom Bracket
For this particular install, we are going to be installing a threaded bottom bracket on a Santa Cruz Blur. The new Sram DUB threaded bottom bracket requires a 12 point bottom bracket tool. This is the same as RaceFace's Cinch design and a RaceFace Cinch bottom bracket wrench will work. Because the RaceFace tool does not make contact all the way around the bottom bracket shell, be careful so that it does not slip and possibly damage the aluminum bottom bracket. We would highly recommend using the Park Tool BBT-79 Bottom Bracket Tool to get the job done properly.
For this specific bike, the bottom bracket width is 73mm and so the bottom bracket will need to be configured for that spec. The Sram DUB bottom brackets use spacers to align the spindle and the chain line on both the inside and the outside of the bottom bracket shell. The inner spacers are traditional bottom bracket spacers and would be pinched between the frame and the bottom bracket itself. The outer spacers are unique to DUB and snap on to the outside of the bearing interface.

 A 2mm outside spacer clicks on to the bottom bracket and the chainguide becomes a 2.5mm inside spacer
Highlighted in blue in the photo below, for a 73mm frame width, Sram calls for no spacers on either the inside or the outside of the non drive side, and only a 4.5mm spacer on the outside of the drive side. On the Santa Cruz Blur, we have decided to install a bottom bracket mounted OneUp Components chainguide. Highlighted in red, you will see that with the chainguide in place, the backplate of the guide becomes a 2.5mm inside spacer and only a 2mm outside spacer is used on the drive side. It's very important that you use the required spacers for the specific bottom bracket width you have on your bike. Apply grease to the threads and torque the bottom bracket to 50 N⋅m on each side. Keep in mind the threads are reverse threaded on the drive side.

**For PressFit bottom brackets, we have found that a minimum of 2.5mm DUB spacer is needed on the spindle behind the drive side crank arm. If not used, the crank arm might contact metal bottom bracket cup.**
2. Insert The Crank Spindle
First grease the crank spindle. Apply a thin layer of grease on the spindle itself and on the splines. Slide the crank spindle through the non-drive side of the bottom bracket and wipe off any excess grease.


3. Install Drive-Side Crank
Make sure the drive-side crank is oriented on the splines of the spindle correctly. Using an 8 mm Allen wrench, tighten the drive-side crank to 54 Nm (478 in-lbs). If you are not using a torque wrench, this is very tight. Once tight, make sure the cranks spin freely in the bottom bracket. Now adjust the top piece to the chain guide around the chainring correctly.


4. Tighten Preload Adjuster
There is a bearing preload adjuster on the non drive side of the spindle. Remove any play from the system by turning the preload adjuster in the + direction until it stops or makes contact with the bearing shield. Use a 2 mm Allen wrench to tighten the preload adjuster bolt until the edges on the adjuster touch. Do not over tighten either the preload adjuster or the pinch bolt.

5. Check The Crankset For Play
Make sure there is no side-to-side play in the crankset by rocking the crank arms back and forth. If there is no play in the system, you are all set! If you do find play in the system, you may either have to repeat step 4 or double check that the spacers used for the bottom bracket alignment are correct.
To Learn More About Sram DUB, Check Out Our Sram DUB Product Overview


This article was written / authored by Max Morgan. Max has been a professional downhill mountain bike racer for the last 10 years, competing in the UCI World Cup downhill series and U.S. Pro GRT series. Having ridden all different kinds of bikes on trails all over the world, Max's experiences being out on the circuit give him a unique perspective on what makes for a quality cycling component. Max also has degrees in Mechanical Engineering and Physics, and so if you don't see out on the trail, chances are he is probably in the garage tinkering on the next project.
© 2026 Worldwide Cyclery


