- Continue Shopping
- Your Cart is Empty


Mountain Bike Suspension Setup: How To Set Sag, Compression & Rebound EP.1 [Video]
Words by: Liam Woods
Why is setting sag and getting baseline suspension settings important?
Getting the suspension setup on your mountain bike can seem like a daunting task. Never fear! We are here to help. In this article, we will be going through how to set sag, get your base settings for air pressure, compression, and rebound. Lastly, we throw in a few other tips and tricks to make suspension setup a breeze. First up, setting sag.
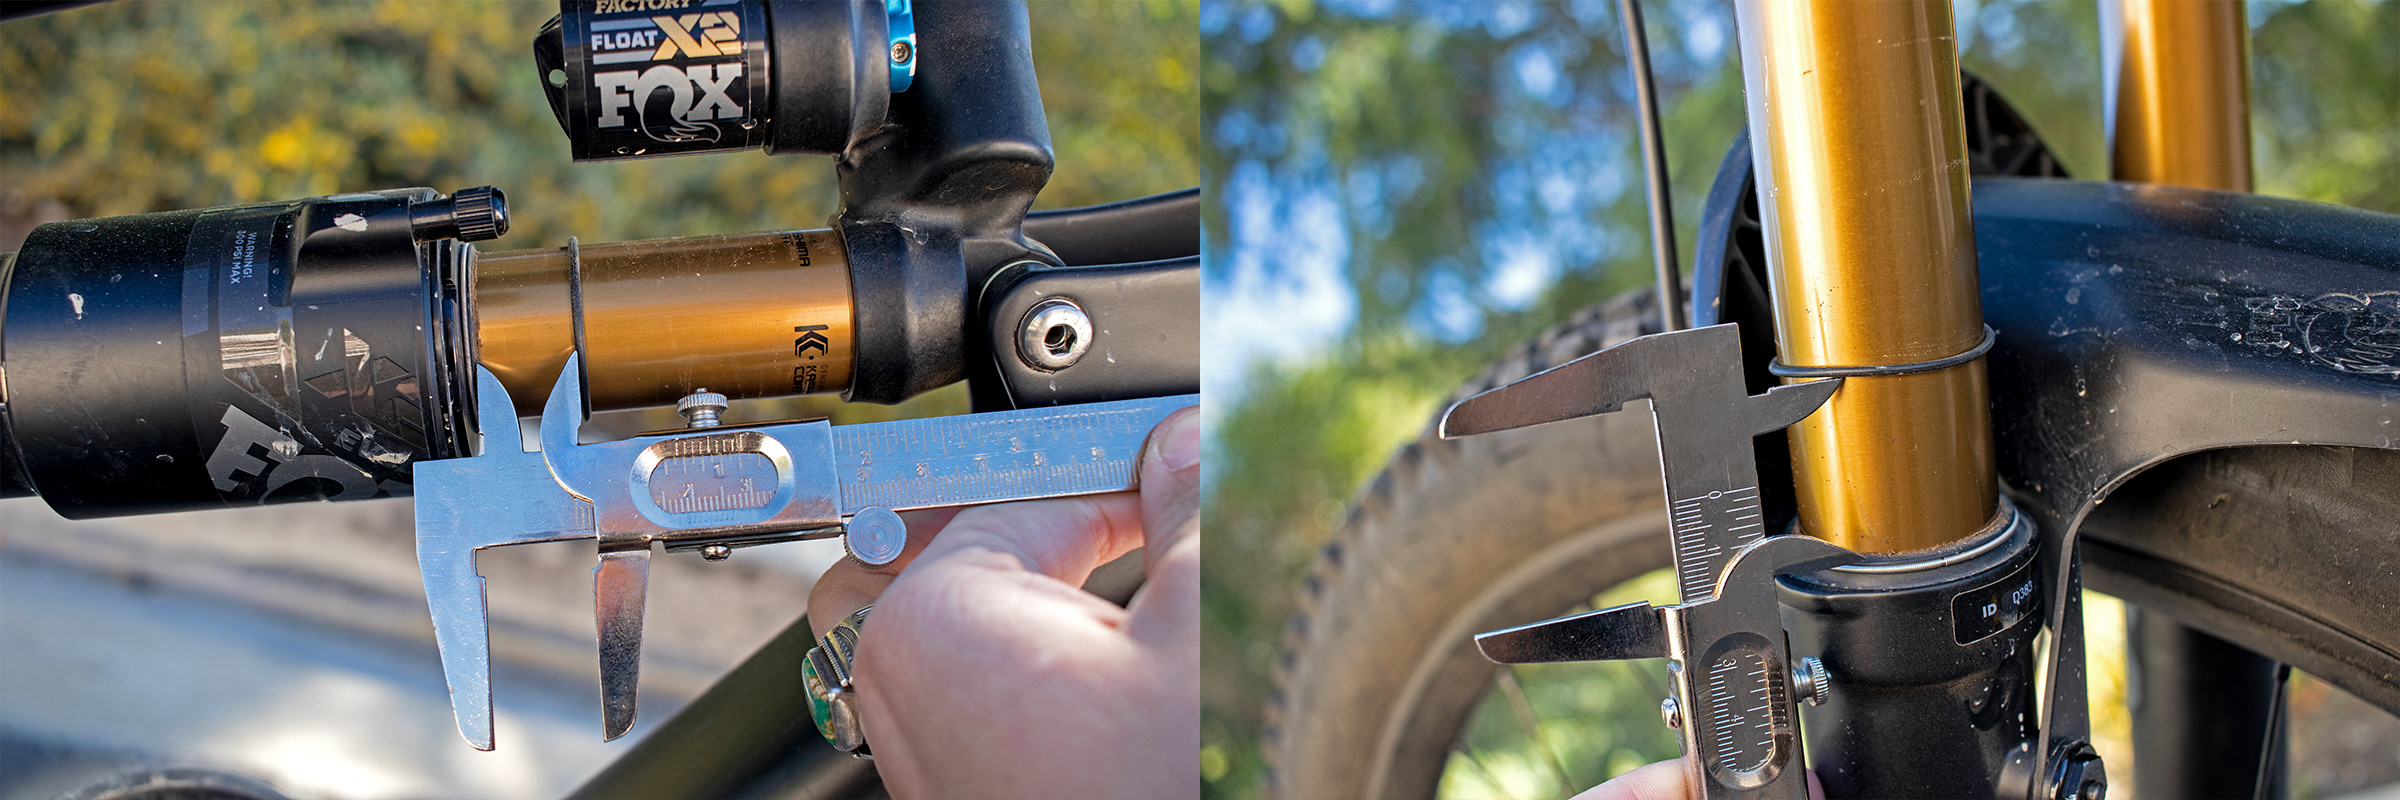
Left: Rear shock sag at 30%, Right: Fork Sag at 18%
Setting sag is your starting point in bike suspension setup. From your first time riding a suspension bike to a pro getting on a new bike, a new fork, or a new shock, everybody needs to perform this all-important ritual. Sag is how far into your bike’s suspension travel, front or rear, you sit when you just have your riding weight on the bike. Getting this first part right is key to having your bike perform as intended. If you have too much sag, you sit “into” the bike too much and you will use more travel than wanted, pedaling efficiency will be far less than optimal and overall you won’t have the highest performance your bike is capable of. You might pedal strike more on rocks, have a “dead” feeling while riding and upon a big hit, could even cause a little damage to your bike. If you have too little sag, you will be riding the bike too high, the bike won’t be cycling through its travel as much, the ride will be rough, you won’t have enough traction when you need it, and you can be hurting how the bike performs both uphill and downhill. It’s especially true when riding down steep terrain, if you have too little sag you might feel like the bike wants to push you over the front end, decreasing your confidence and not allowing you to ride as fast or smooth as you might be able to. These are the first reasons why sag is important. It also has a direct impact on your shock’s rebound settings and incorrect sag combined with incorrect rebound is a recipe for a frustrating ride.
Left: Fork with too much SAG, Right: Rear Shock with not enough SAG
Do you remember the order of operations in math from school? When it comes to suspension setup, I choose to set air pressure or suspension sag first, then go to rebound, and then finish with compression. This will get me to my base settings from which I will start to tune my bike. Why did I choose this order? Sag is first and should always be first, that’s just how it is, I don’t make the rules (but there definitely are rules that I won’t get into here). Second, rebound changes depending on how much air pressure you use or what your coil spring rate is. With more air pressure or a high spring rate, you then need to slow down your rebound to correct the air pressure or coil spring rate. Last, is compression which affects how your suspension shaft, or stroke, moves.
Once I get all these base settings I write them down in a notebook, typically a small pocket notebook (or just use your phone like everyone else on Earth). This is so you can see where you start, make a single or small change at a time, record that change, and then take notes on what you felt. You might make some changes that work for a trail or zone, but when you change trails or terrains, being able to revert to base settings and adjusting from there will almost always put you in a better position than guessing and checking from your previous settings.
Left - Right: Air Pressure, Rebound, Compression
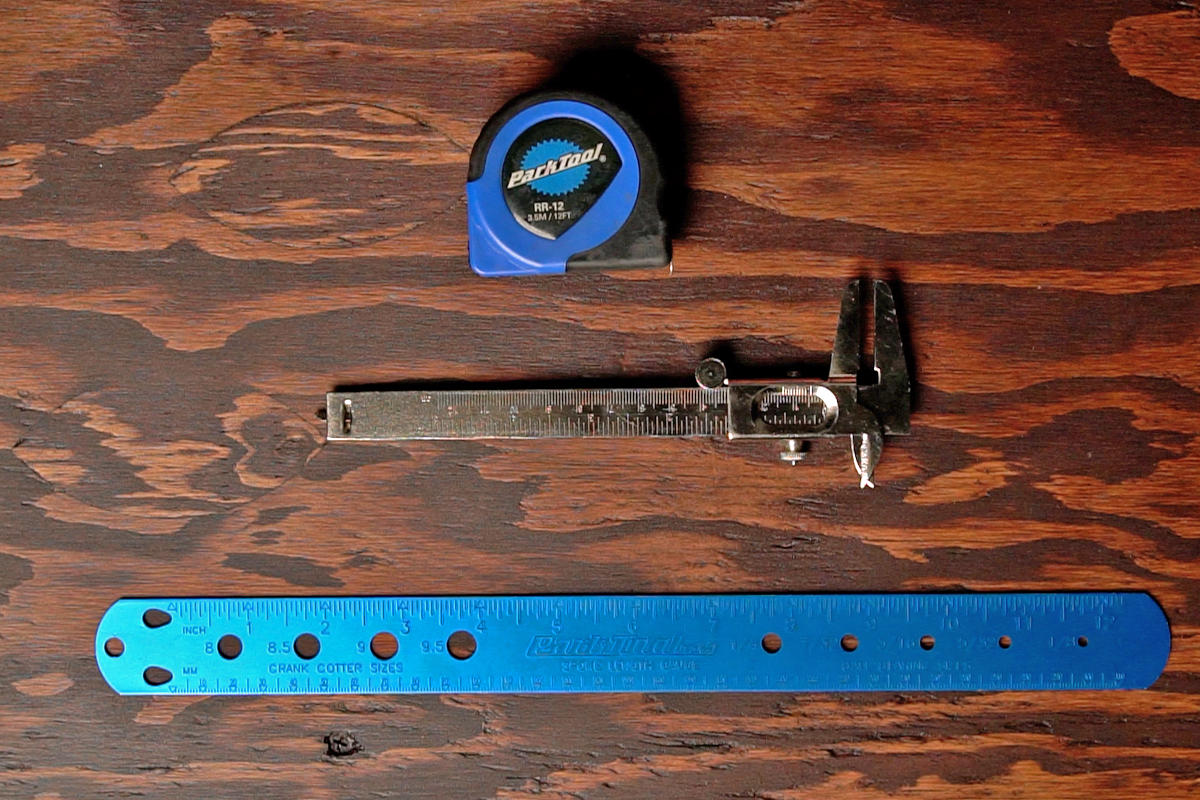
Now let's get into the actual set up. We will help you every step of the way, allowing you to learn and also dial in your bike as we go! Get a shock pump, something to measure, like a ruler, some calipers, a tape measure with centimeters and possibly some hex keys for your compression dials, if your shock requires that.
Rear Shock Sag:
Now we are ready to start setting sag on your rear shock. It doesn’t really matter if you do your fork or your shock first, but I usually choose to do my rear shock first as it usually benefits from a higher percentage of sag. If it’s really off then it could slightly change your weight balance on your fork sag, but it’s not the biggest deal to do one or the other first. Depending on what brand of bike you have, there might be a setup guide to help you get close. There may also be a recommended percent sag based on your bike model. I’d say most are around 30% for the rear shock. Some could be closer to 25% and others could be more like 33%, but it really depends on the style of riding you’re doing. Either way, I would start by looking up your bike, model, and what the manufacturer recommends. Then you can also check out the shock manufacturer’s recommendations. Some have a suggested pressure, but be aware that based on your bike’s leverage ratio and suspension design, the starting number could be waaaaaay off, but it’s still a good idea to check. For example, if you have a Yeti, they have a great suspension setup guide that pretty much gets you within a few PSI of where you should be and rebound/compression adjustments that are a great place to start, but not all or most brands are like that.
So let’s say you have nothing. With the rear shock I would start with your body weight in pounds. Put that number into your rear shock and with the rear shock pump still attached, cycle the rear shock a few times into about 30-40% of the travel, if possible. It might require you to jump on the bike, especially if you are pumping up a shock from 0. I would actually start by cycling the shock every 50 psi if you are pumping up from 0. What this is doing is equalizing the positive and negative air chambers (coil shock folks need not pay attention here), and if you pump from 0 to 180 psi, that's a hard shock to press down. So once you have equalized the chambers, keep pumping up to your desired body weight number (be honest with yourself, nobody needs to know but it will greatly affect your setup) so we can take our first measurement. And always keep in mind what kind of riding gear you’ll have on. What you see on the scale in the morning is pretty much always less than you in your riding gear.
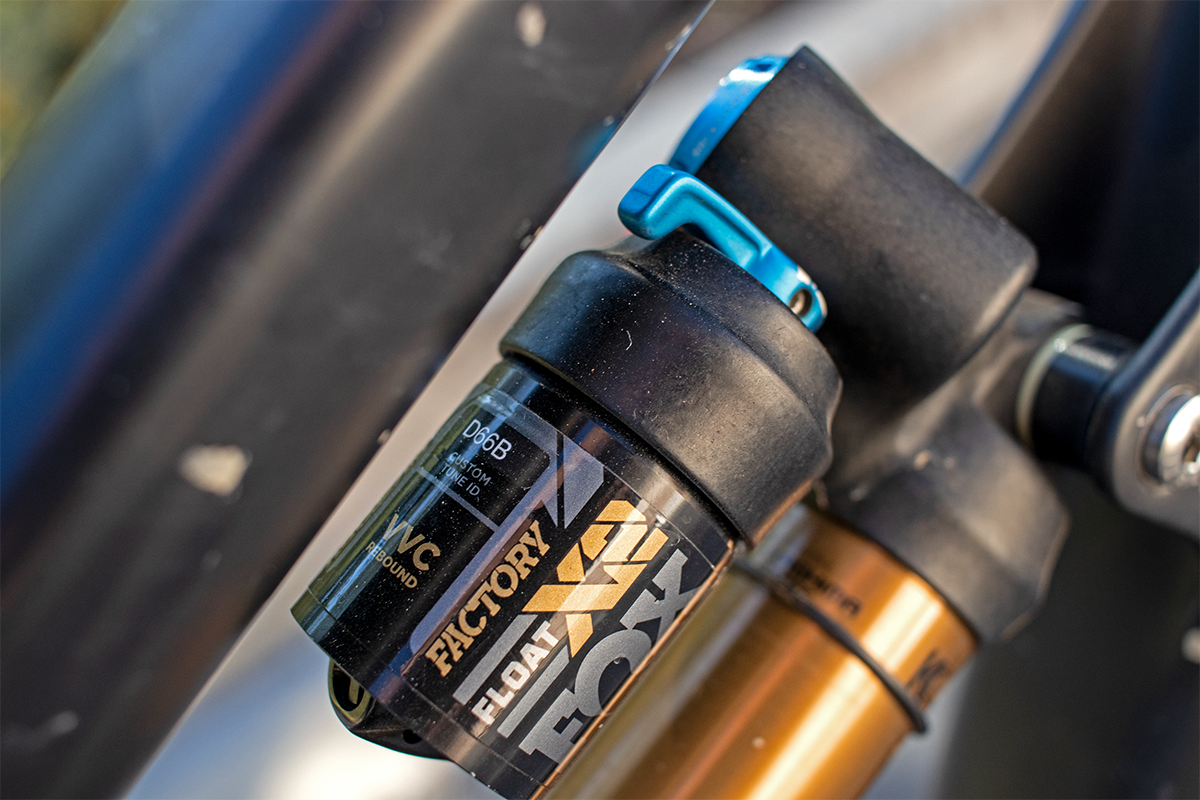
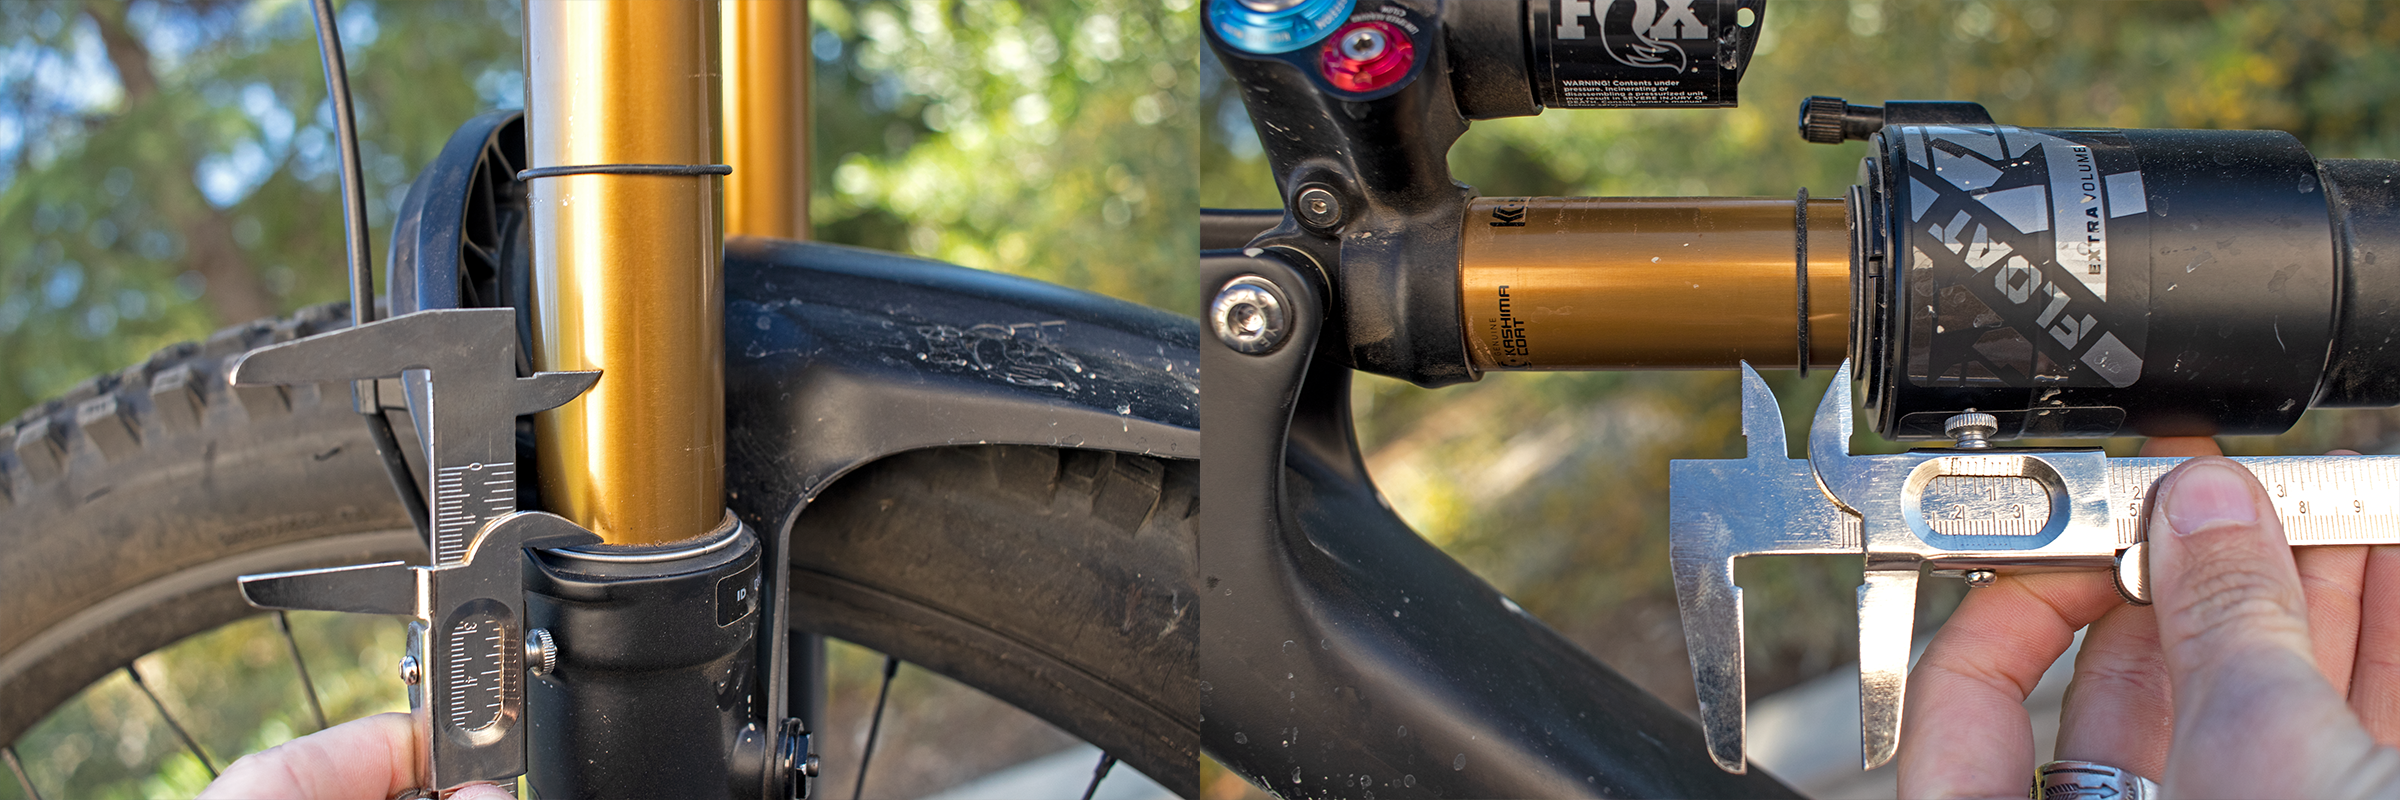
To make life easy, Fox suspension has a tune id, that will tell you the shock stroke length
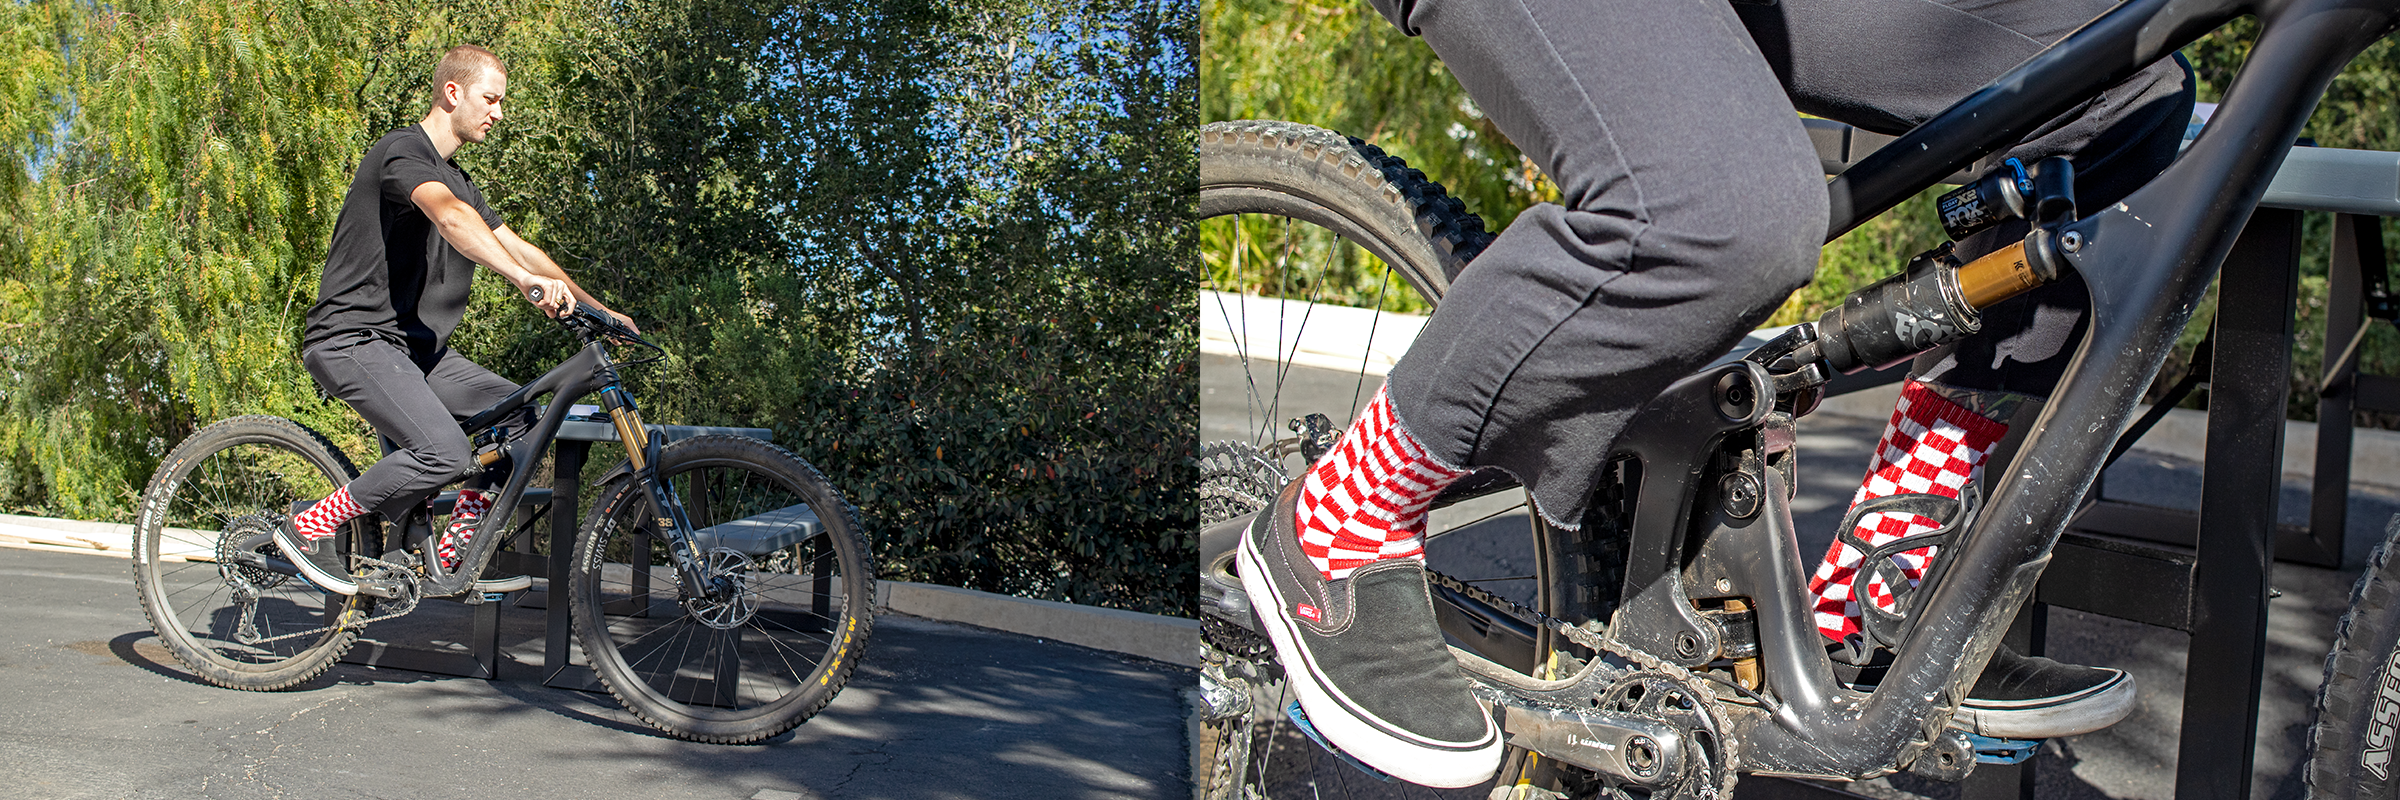
To take your first measurement you want to stand next to something stable if you are by yourself, like a table, a wall, maybe a solid stool, etc. Get on the bike and give it a few bounces, then get into your position. This can be different for everyone. Some choose to be in a riding stance like going downhill, others sit down with the dropper up, or the dropper down. It really doesn’t matter much as long as you do it the same way every time. For myself, I choose to do it sitting down with the dropper down. I do this as I normally adjust sag by myself and I find this is easiest to reset the o-ring. After standing or sitting on the bike and bouncing it a few times, very carefully reach down and slide the o-ring down until it’s sitting against the shock seal. Then, very gently and without any bouncing (don’t let the shaft move!), put your feet on the ground and stand up.
Now you need to measure the distance of the o-ring on your shock stroke. To find your 30% or whatever number you are looking at, it might take a little math if you are doing this from scratch. Yeti’s setup will say you need (18mm) of shock stroke to get 30% sag, but most are not that clear. Again, it may help to look up your bike model since you can sometimes find the stroke length. If you have a Fox rear shock you can go to BIKE HELP on their website and type in your 4-digit tune code, which should give you the stroke length of your shock. For our example, we used a Yeti SB150, which uses a 230x60mm shock, so for 30% sag I am looking at 18mm of shock stroke (Math: 60 x 0.3 = 18). Do that with your bike’s stroke length and get that number. Now with a ruler, tape measure, or what I like most, a pair of manual calipers, measure your sag. From here keep adding or removing the pressure to get to the desired sag number for your bike. Make sure when adding or removing air pressure to equalize the air chambers before removing the shock pump so you can tell what psi you are really at. That is pretty much it for setting sag on your rear shock.
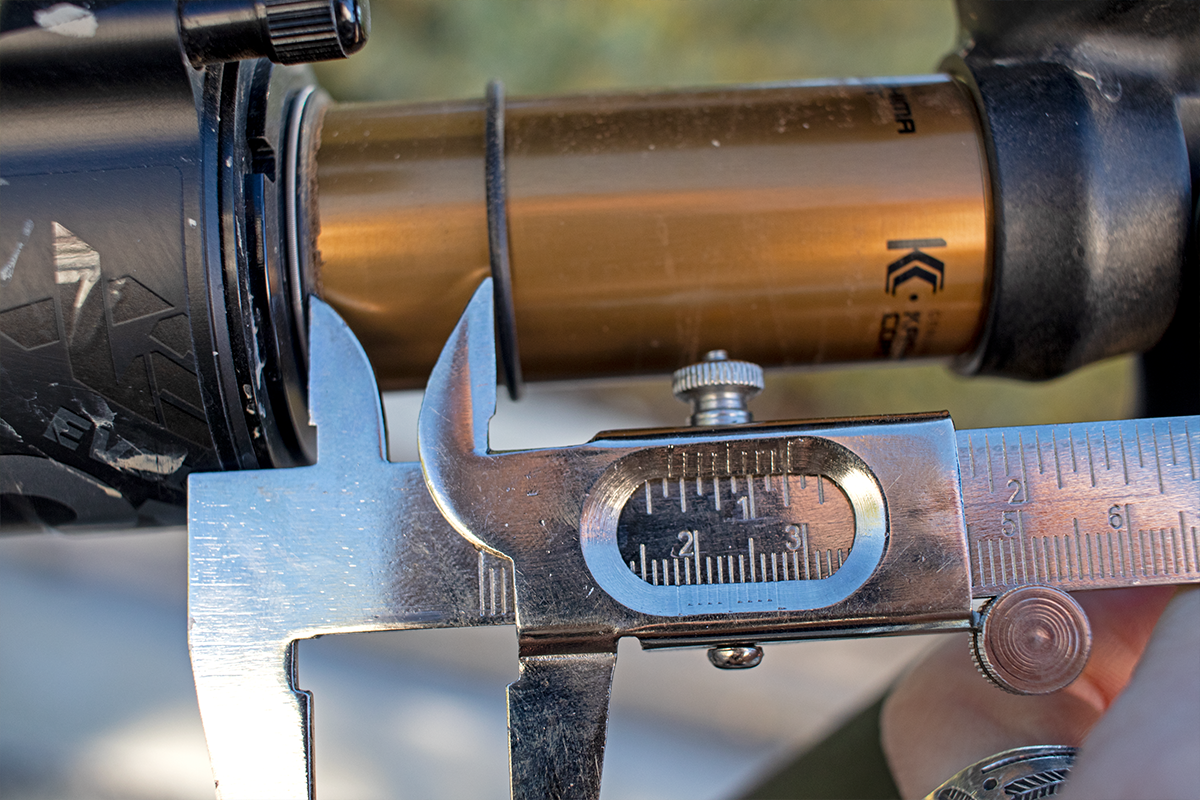
Perfect 30% shock sag, 60mm shock stroke = 18mm for 30% sag
Fork Sag:
The process is basically the same for your fork sag but instead of 25-32%, you will be looking at about 15-20% sag. Keep in mind that you can always go more or less depending on preference. I choose to be near the middle in the 18-19% range for sag on my front fork. If you have a RockShox fork, it’s pretty easy as most have the measurement and percent number on the fork upper stanchion tubes. Almost every brand of fork has a pressure chart on the fork leg so you can easily check your weight on that chart and start from there.
Headtube angles and bike setup (like a low or tall riser bar) will change how much weight you actually have on your fork, as well as what sag percent you actually need. Remember though, this is just a starting point and things can always be adjusted. If for some reason you are starting from nothing, a good starting point for choosing psi is using whatever your body weight is in kilograms, which is about .6 of your body weight in pounds. Again, follow the sag process from above by being next to something stable, gently sitting down in the same position you did the rear shock in, moving the o-ring down, and then gently getting off the bike without moving the o-ring. Then using your fork travel (the SB150 has 170mm of fork travel) and your desired sag percentage and do some math (170 x .18 = 30mm). I’m looking for a hair over 30mm on a 170mm travel fork. Keep messing around, equalizing the positive and negative chambers each time you change pressure and repeat this process until you get to your desired measurement. Give the bike a couple of jumps and bounces, see how it feels (you should be close), and get ready to move onto rebound adjustments.
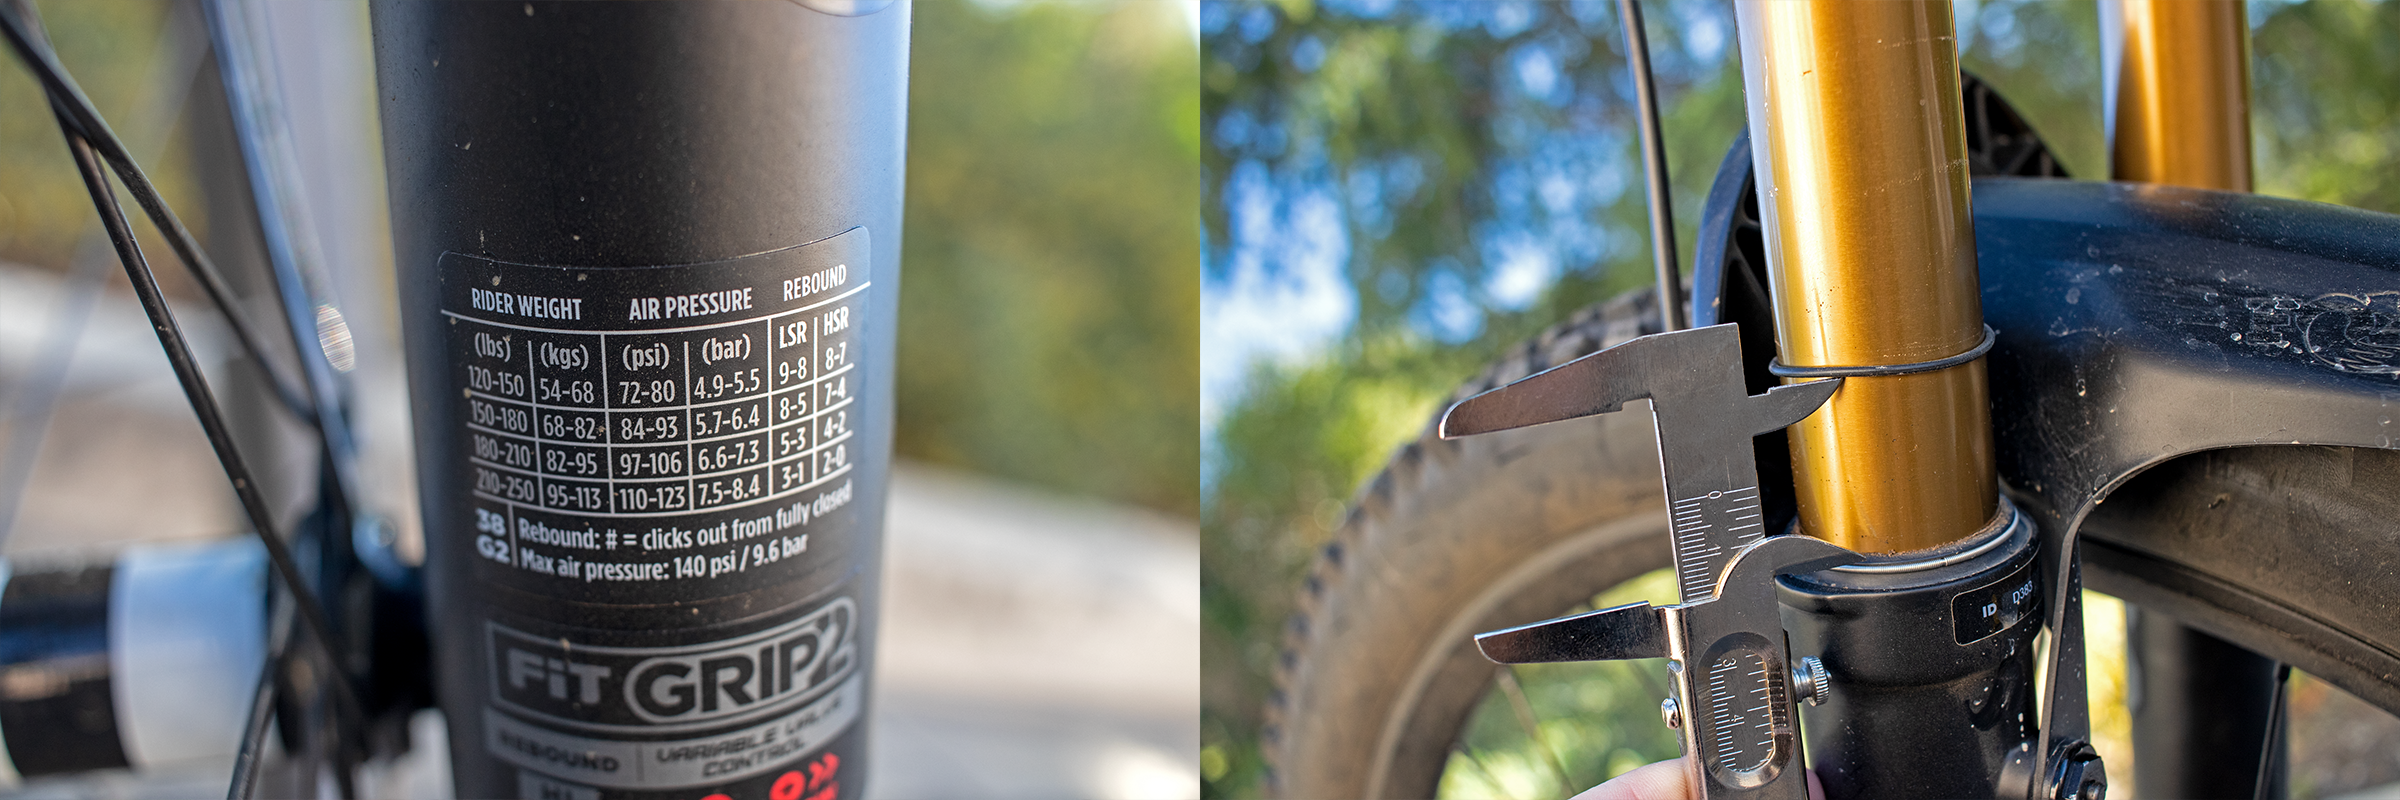
Check your forks reccomended air pressure chart for a solid starting point
Rebound:
Rebound can be your best friend or a feared enemy if not set up right. Many of those Friday fail clips you see are due to horribly set rebound, either being too fast or too slow and launching them off the bike upon landing. What does rebound do? Rebound controls how fast or slow your fork/shock returns to full extension from a compression. If you add more rebound, you are slowing down the forks return, closing off the rebound circuit and how fast oil can move through shim stacks or circuits. By removing or opening your rebound, you are allowing oil to move more freely and therefore speeding up how fast your fork returns from a compression. It’s easiest to think of the adjustment as rebound damping. When you add rebound, you are damping the circuit, and vice versa. You want your rebound to be set to your air pressure or spring weight. It's a little different for everyone as there will not only be different air pressures, but also preference. For example, Jeff and myself run similar air pressures on our bikes, but his rebound is always 1-3 clicks faster or more open (less damped) than mine. It’s not right or wrong, just how he likes his bikes to feel.
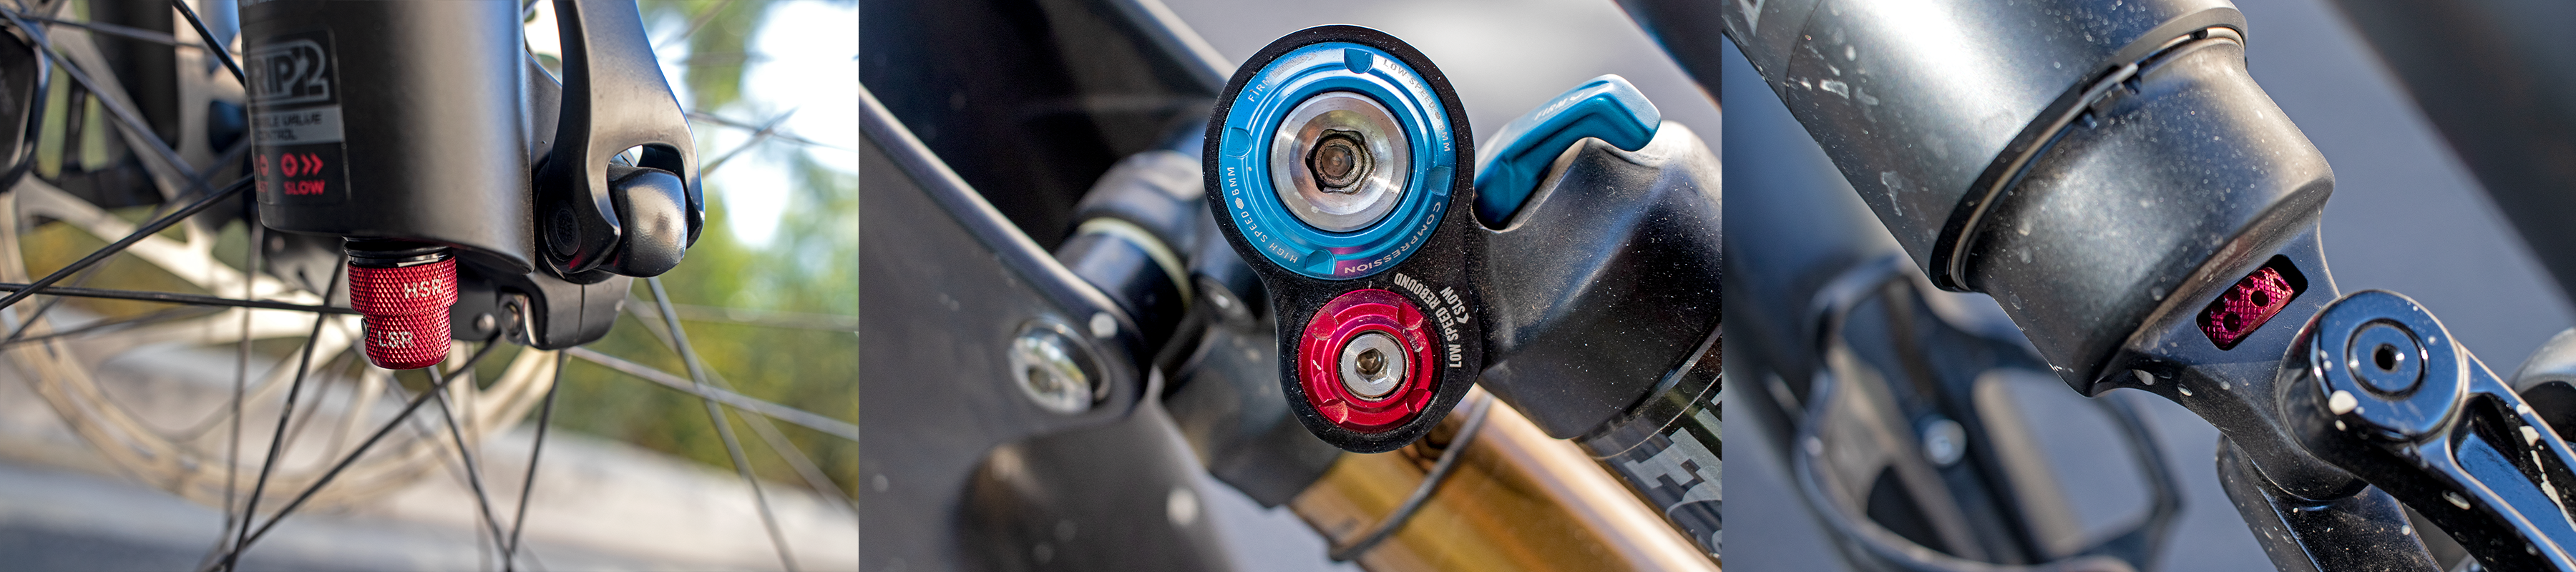
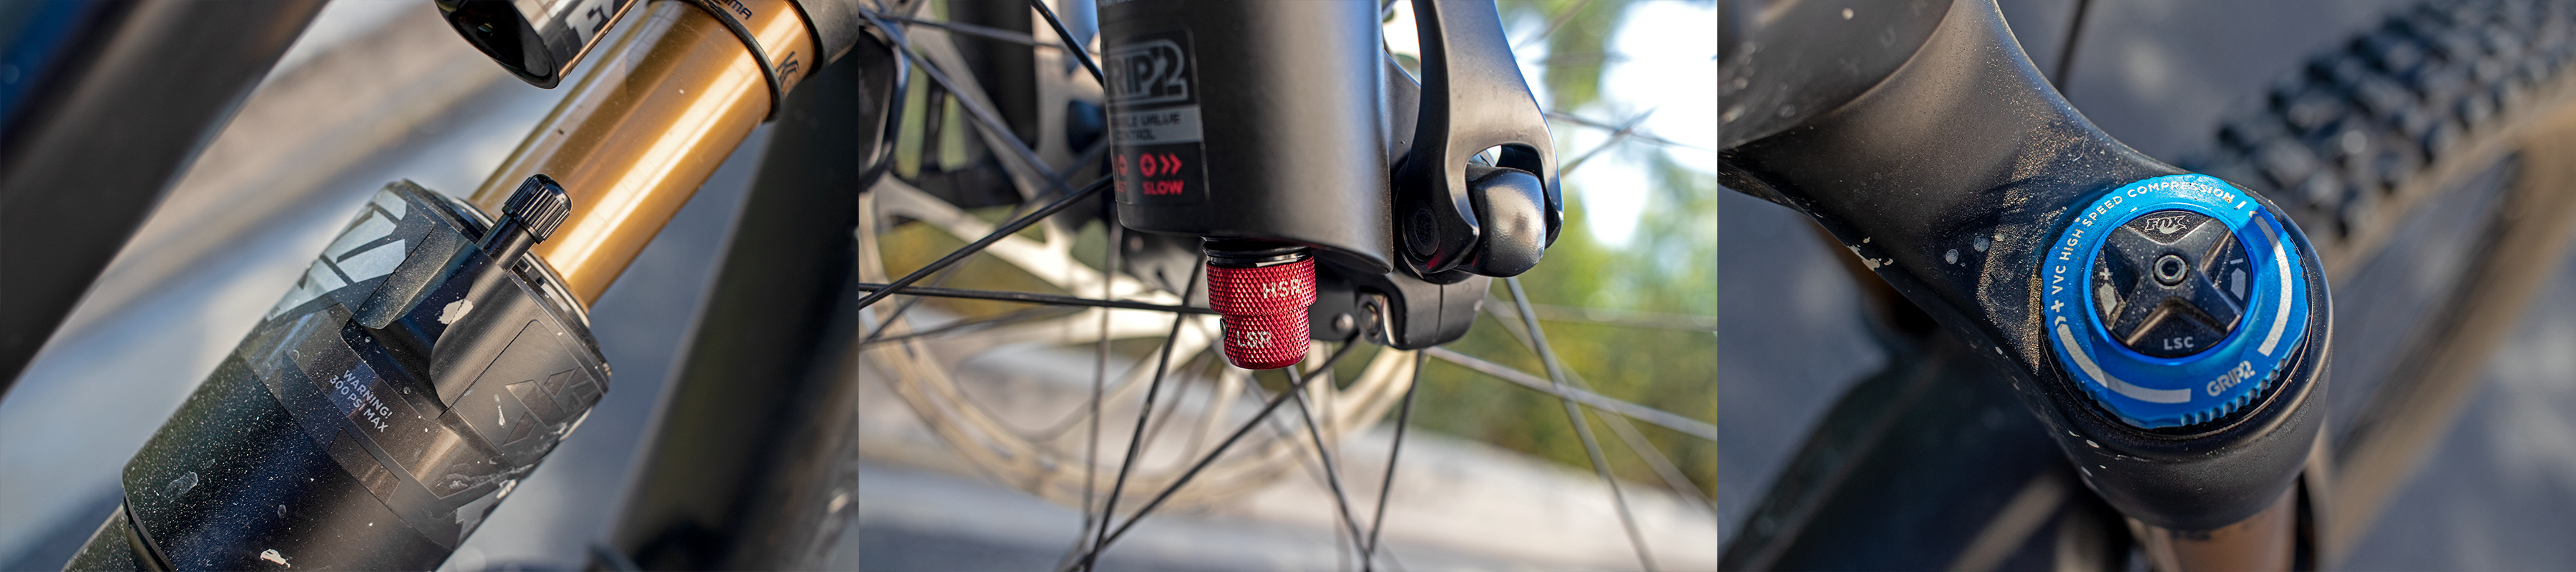
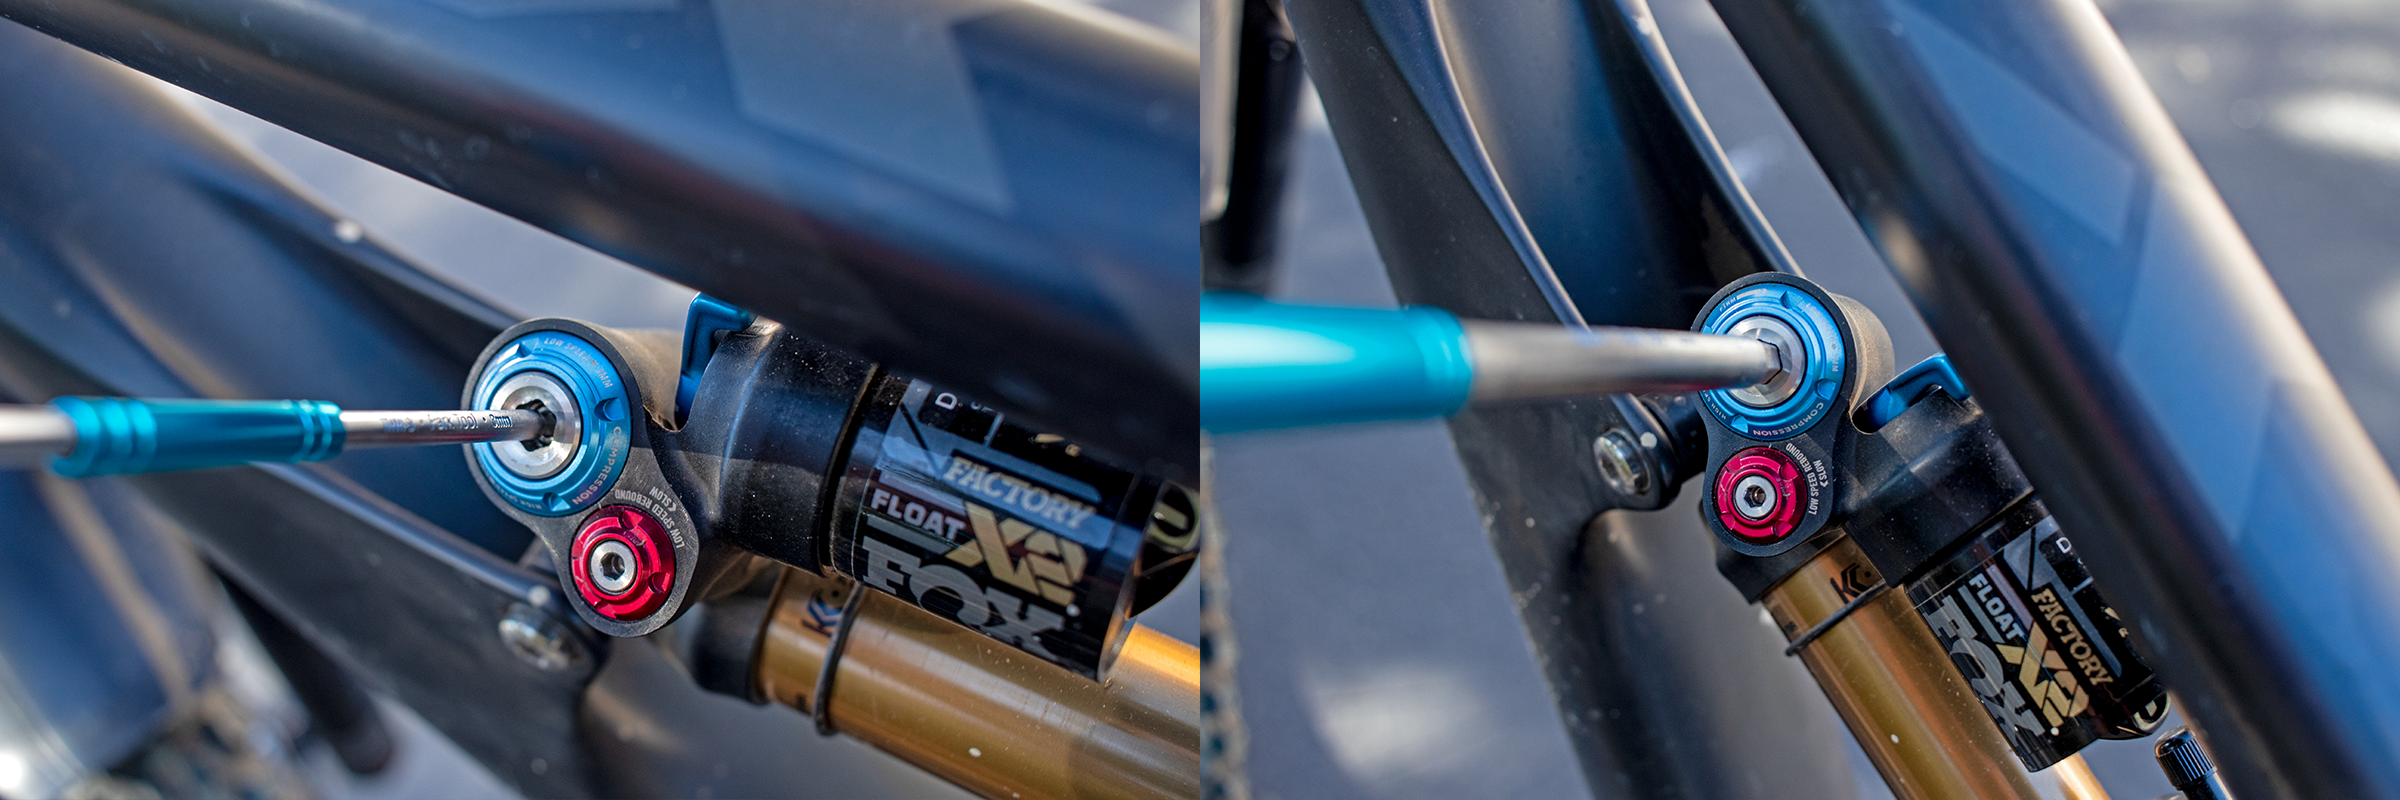
Fox Factory 38 & Float X2 has both HSC & LSR, Left: HSR/LSR on the Grip2, Middle: LSR on Float X2, Right: HSR on Float X2
Most forks and shocks have only a single rebound that controls both High Speed and Low Speed rebound adjustments, and it does them at the same time. But there are lots of forks and shocks out there that have individual HSR and LSR adjustments. So make sure to check what your fork and shock have. For our setup, we used an SB150 that does in fact have HSR and LSR on the fork and shock, so I will help guide you through a bit of set up on that.
HSR and LSR Explained
This is a very confusing topic for most and there is not enough information given to a customer who might buy a product with these adjustments. High Speed Rebound is for controlling hits and rebounds at a high rate, so like big jumps with a harsh landing, big dips or g-outs, and even some fast chunky rock gardens with lots of square edge hits. Think of a section of trail that might have some repetitive drops, or a 50 foot rock garden that has some wheel sized rocks or bigger. Having your suspension dive deep into the travel, to come out from that deep hit your HSR circuit will come into play. I think HSR is super important to adjust as this helps keep you controlled and from flying off the bike like those fail videos. I tend to go a touch slower or add more HSR when doing my first test setup if I am not sure where to start. Low Speed Rebound is the opposite, with slower speed hits or bumps like a smooth berm, rollers, minimal rock gardens or just bumpy sections of trail. This is the rebound you feel most often and what you might feel upon a first test in a parking lot or on some smooth trail.
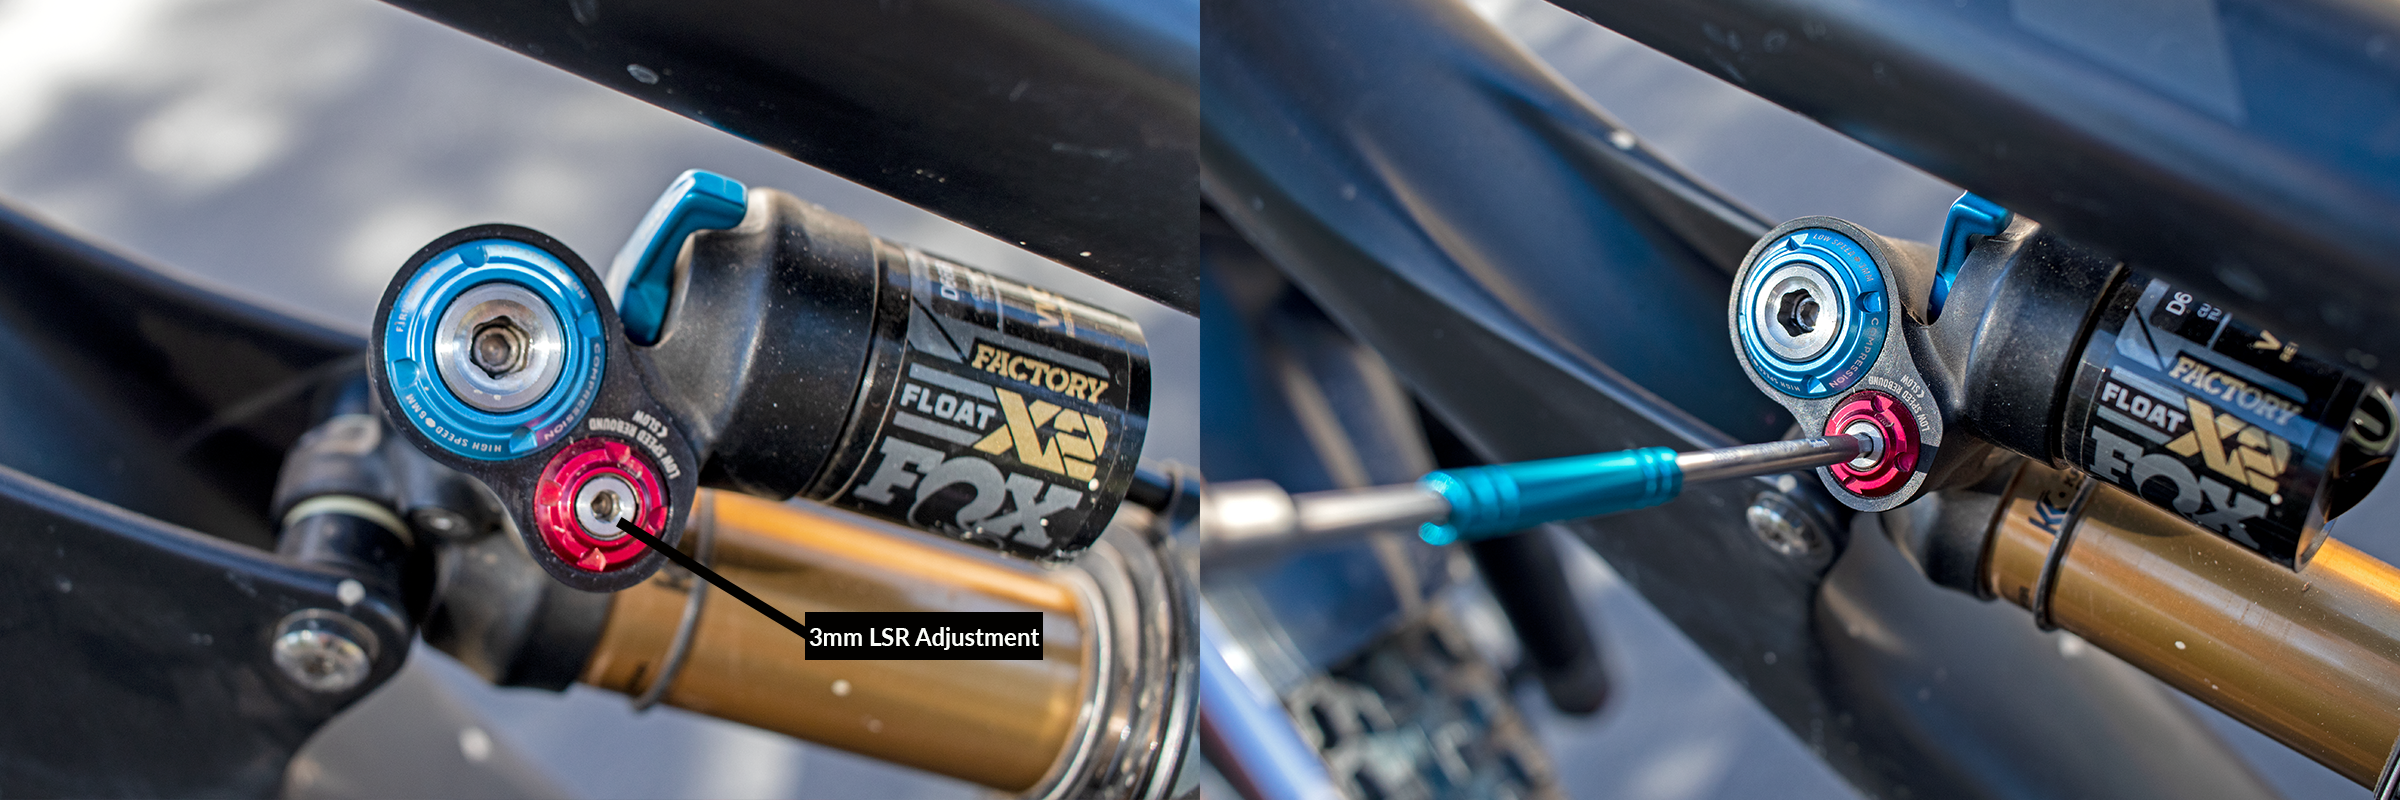
LSR adjustment on the Fox Float X2
We are now ready to adjust. When adjusting your rebound, check your setup guide, be it your bike or suspension manufacturer’s recommendations, and see what they suggest for your spring rate settings (this goes for both coil and air). On almost all forks and shocks, the clicks are counted from fully closed, meaning you close out the adjustment fully clockwise until it stops, then count the number of clicks from there. If you are starting from scratch, I would start in the middle. So for example, if you have a total of 20 clicks of rebound adjustment, close out the rebound adjustment and count 10 clicks to get you in the middle. From there, give the fork or shock a few bounces. At first, give the shock some bounces without being on the bike. For the rear, push down quickly on your saddle and then let off the saddle with both hands, allowing the shock to return under its own power.
Now, this is a bit harder to explain in a blog, so double check the video above. When you let off the saddle you want the bike to return quickly, but not too fast. If the saddle stays in your hands when you let off or the saddle smacks your hands as you pull off it might be too fast. You want your suspension about as fast as possible without having the rear wheel jump off the ground or the saddle smack your hands every time. Now if the opposite is happening and you let off the saddle and it takes longer than you expect or like it took longer than it did to compress the suspension down, it might be too slow. Again, this is a personal preference, and riding styles or people might like it a different way. Jumpers normally like it a bit slower, and DH and Enduro racers might have it faster. But for myself, I like it right in the middle, for the suspension to return about the same speed as my quick push down was. Again, hard to explain here, so I would go watch the video on this.
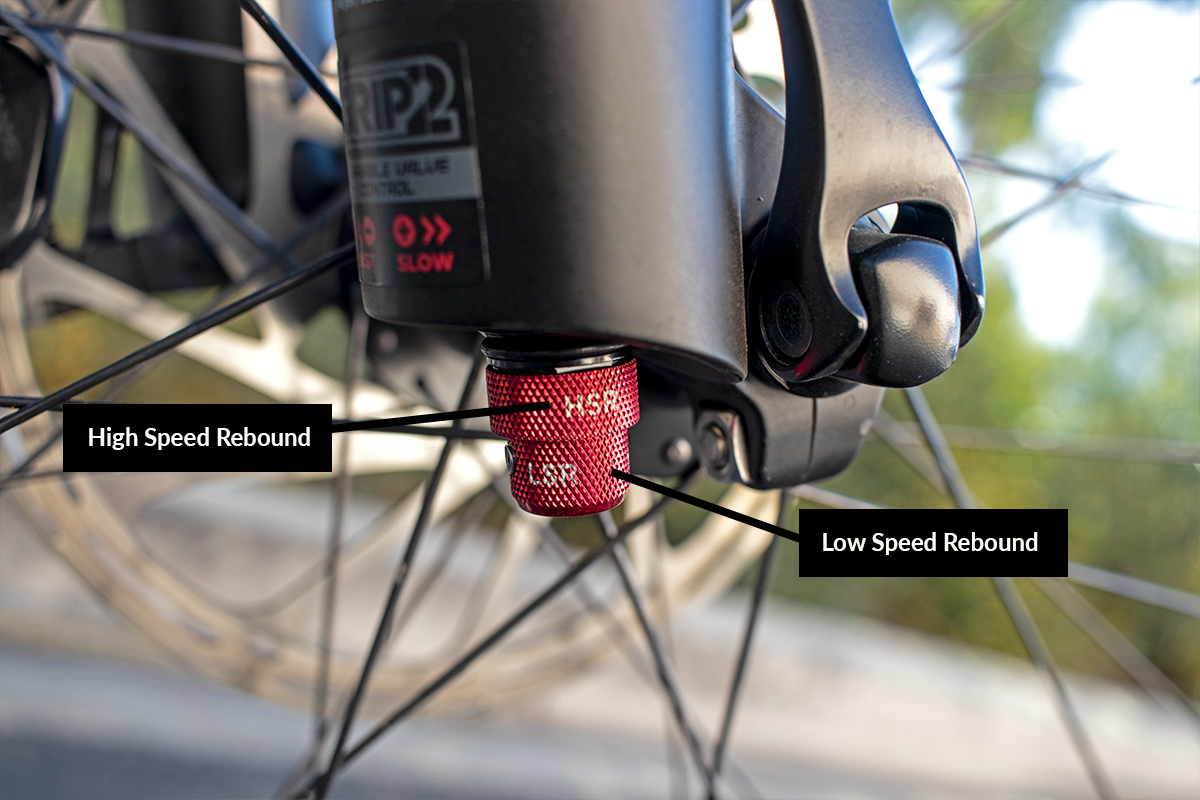
Fox Grip2 damper rebound adjustments
Go out and try it, first in the parking lot or trailhead, with a couple of bounces and bunny hops. Try jumping off the curb, see if you sit into the bike too long and if it feels dead. From there, take out some rebound or speed it up. If it feels like a pogo stick and bouncing you around, I would slow it down. Take note of where your start and how you change it, what it felt like before and after the adjustment.
Compression:
Our last adjustment to make before you are ready to nail down your base settings is compression. Again, some shocks and forks might have zero compression adjustments and just a climb, pedal, or lockout switch. Whereas some might only have Low Speed Compression (LSC) and others might even have both High Speed and Low Speed Compression adjustments. So, first see what your shock has and again check out your bike or suspension brand’s recommendations on where you might want to start.
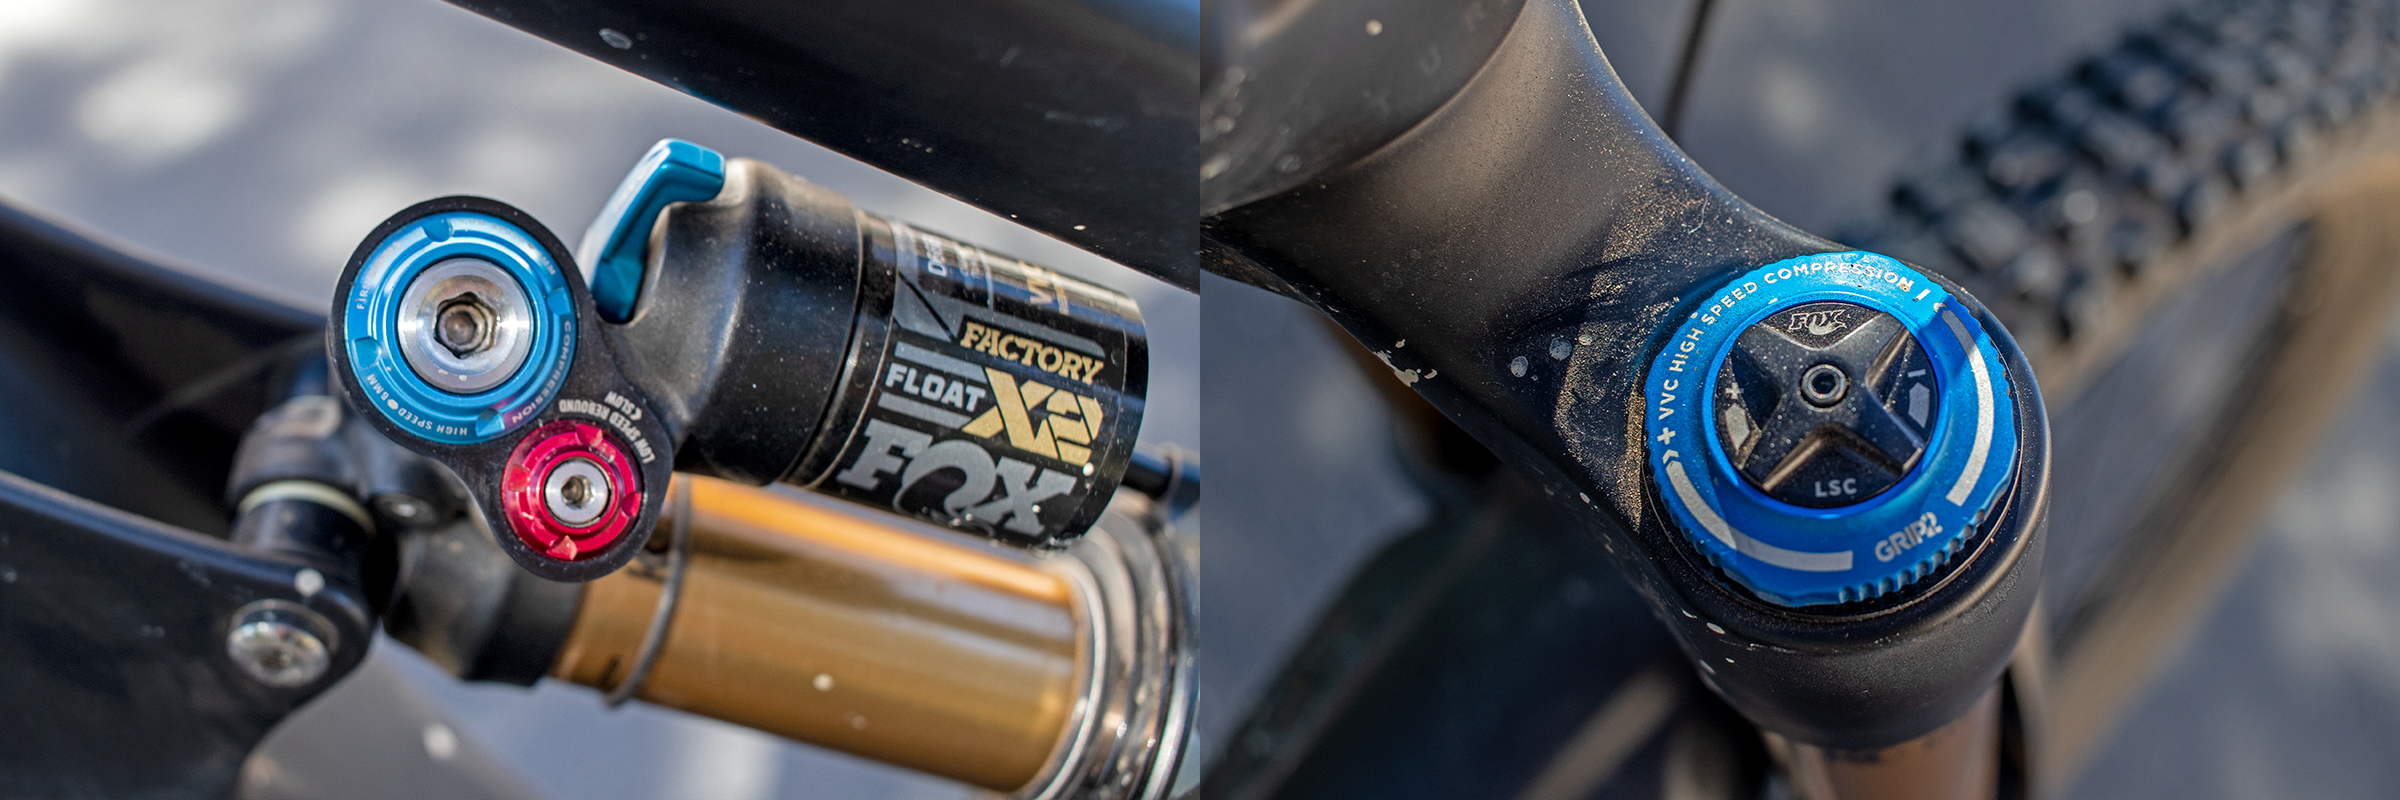
Left: Fox Float X2 HSC/LSC, Right: Fox Grip2 HSC/LSC
What is compression? Many people confuse compression with spring rate (which is either air pressure and air volume adjustments or coil spring rate), and while they do essentially change how hard it is to compress the shock, they are totally different and need to be adjusted differently. Part of the reason I do it last is you get sag first as that is the key place to start, then rebound so you’re not getting pitched off the bike, and finally compression to really dial in how your suspension moves.
Compression adjusts shaft speed, while air pressure or sag adjust how much you sit into the travel and how much weight it takes to compress the suspension. Shaft speed is not the same as the weight needed to move the suspension. Let’s try to keep that clear. You can have your fork at 100psi and it will take quite a bit of weight to move that and it will get progressively harder to compress as you move through the travel. But if you have your LSC and HSC closed out and put that same weight on the suspension with a slightly lighter air pressure, you will get more travel out of the fork for the same weight. It might take a few seconds for the shaft to move with your LSC cranked down, but it will in fact move.
LSC and HSC Explained
Low Speed Compression changes low speed shaft movements, similar to low speed rebound. It affects rollers, berms, and minimally rough trail sections, and High Speed Compression affects those high speed harder impacts. But unlike high speed rebound, high speed compression can happen anywhere within the suspension travel, at sag or above, and all the way to bottom out. Hits like big jumps, drops, square edge rocks, or anything sudden that moves the suspension shaft at a fast rate.
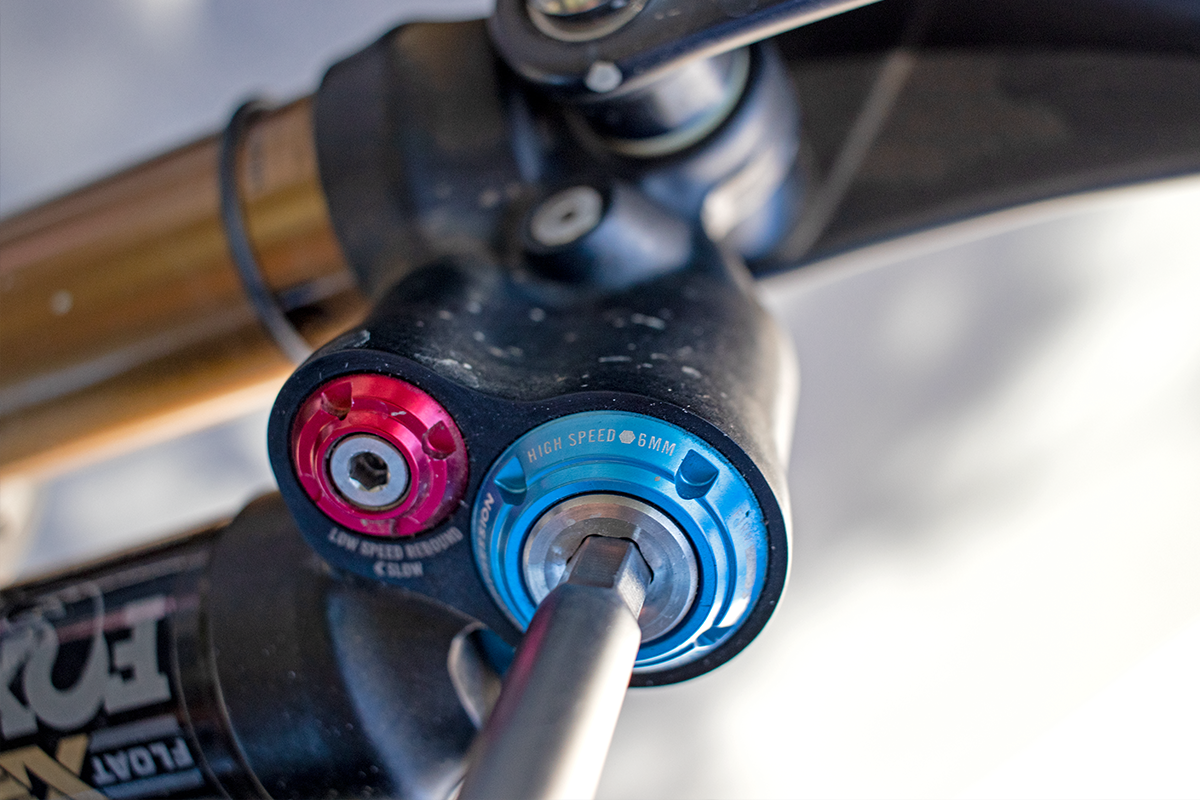
Left: LSC 3mm adjustment, Right: HSC 6mm adjustment
When adjusting your compression, you can start a few different ways. Your weight while wearing all of your riding gear might dictate how you start. For example, I am a light rider at 150lbs, and I normally start with compression wide open (fully clockwise) when starting to tune my suspension. The reason being is I find I don’t need a lot of HSC or LSC on most bikes in order to get where I need to be. Now if you are in the 180+ zone, I would start from the middle, as we did with rebound, then back out or add more depending on how that feels. If you have too much LSC, your suspension might feel a little grindy, like sand is in it, or is no longer as smooth, so back out a little. If you are moving the suspension super easily and think that a little more support on slow speed stuff could help, add LSC. One thing when adding LSC, if you have too much it can cause the bike to stand up in steep sections of trail, and that is not what you want, especially in the rear of your bike. You do want to squat and use your weight and weight transfer to make the bike more stable, not less stable. So keep that in mind: what might feel good on a not so steep or smooth section of trail might not be the best when things get really steep. HSC is a little easier to set up. If you have too much, you will not use all your travel and might feel like you are getting a harsh mid zone of travel and even if you are at or under recommended pressure you will not use all the travel. Too little HSC and you might dive into the travel a lot, bottom out easily, and feel like your suspension is soft even if you are at or above the recommended spring rate.
Again, write down where you start, and take notes before and after an adjustment so you can help dial in your base setting and how you got there.
Final Tips & Tricks:
If you made it to this point, then you should be close to getting your setup fully dialed in. Hopefully, you learned a few things and now know how to do this again when you get a new bike, get your suspension serviced, or a few months down the road you no longer feel extremely comfortable and you could use a reset. We’ll leave you with a few tips and tricks to look out for when setting up suspension. To start, when setting sag, do not engage your brakes. Holding your brakes could hinder the movement of the suspension travel. Write everything down, what the fork or shock air pressure recommendation was at, where you ended up getting your preferred sag if it’s different, and do the same with rebound and compression. Then after you set it and go test, take notes if you changed your settings. If you made your rebound slower, why did you do that and did it feel better? If you want more air pressure because it feels soft or you are using too much travel note that down. This way you can always refer back to your notes. Maybe you slowed the rebound down as you were riding a flow trail with jumps, but now are riding steep, chunky terrain and removed two clicks of rebound making it faster. Note that you did that for steep, chunky trails. This will become a very valuable book in months to come and can be an insight to your riding style and maybe why six months ago you felt faster or you made a change and it opened up a new confidence in your riding ability.
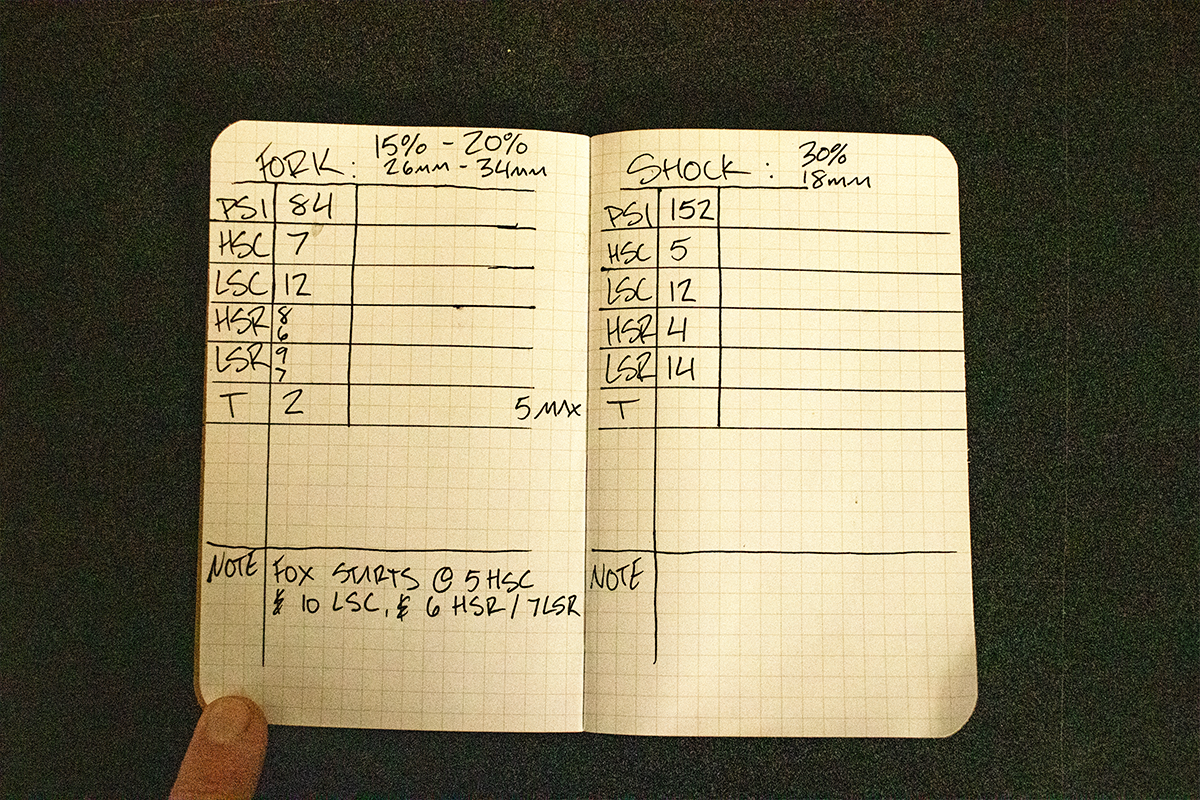
Make a chart, write your settings down, and try to stay consistent
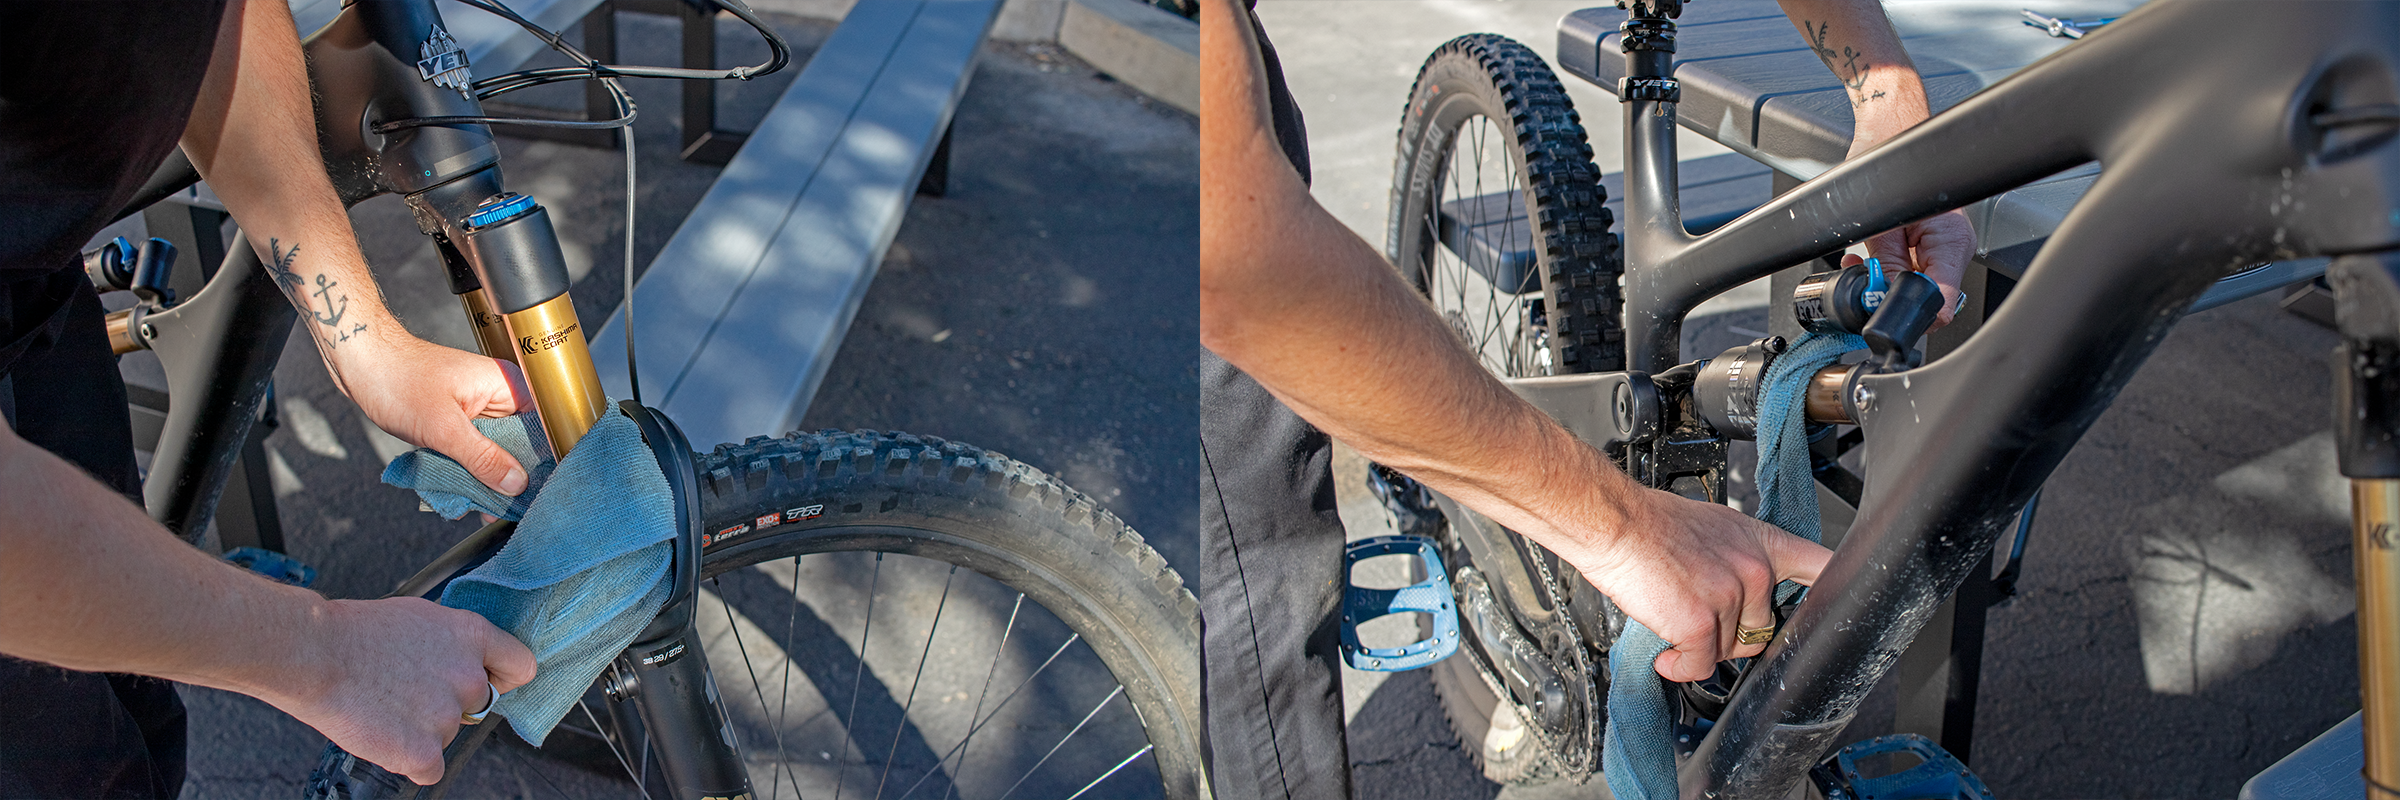
The last few things are to always keep your suspension clean. Wipe down your suspension dust wipers after every ride. With a clean microfiber rag do a little flossing. If you haven’t serviced your suspension in a while, look into doing that. It will not only feel better but make your suspension last longer being clean and with fresh oil and seals.
The next suspension tech episode and article will focus on more advanced suspension setup, such as when and how to use air tokens, and better compression and rebound adjustments with bracketing while out on the trail.

This article was written / authored by Liam Woods. Liam has been in the bicycle industry for over 10 years as a racer, professional mechanic, service manager and as of late, media and content creator. Liam has ridden thousands of different bikes, ridden countless components, tested endless MTB apparel of all kinds and written reviews on it all. He's a key piece to the Worldwide Cyclery "All Things MTB" content creation puzzle. He also makes consistent appearances on the Worldwide Cyclery YouTube channel and Instagram.
Transcription
Ladies and gentlemen, if you are at all confused on how to set up the suspension on your mountain bike this video is for you. We basically took a master class and we watered it down to a roughly 15 minute 101. This is air suspension for mountain bikes how to set up everything: fork rear shock sag/pressure rebound and compression. This video is presented by Liam. He is our head mechanic at Worldwide Cyclery. He is an absolutely phenomenal mechanic and knows a ton about suspension setup. This stuff is complicated, it's a little dry sometimes but it is very, very valuable because having properly set up suspension can make or break how your bike handles and feels which then can make you have a lot more fun or a lot less fun when you're riding your mountain bike out on the trails. Take a look right here. This whole video is broken out into chapters that are time stamped which you can also see down in the video description. So if you just want to go to something like compression or rear shock or fork whatever it's all right there so you can click through to it. Enjoy
So when setting up your suspension, sag is the easiest starting point. When you get the sag, we need to measure how much you're sitting into the bike. The fork and shock have different percentage ratios, so on the fork we're looking around 15 to 20 percent of sag and on the rear shock it's going to be 25 to 30 percent of sag. Now setting the sag to that measurement is really important. If you have too much or too little, it's going to change how your bike rides. If you have too much meaning you're sitting into the bike too far, you'll be really squishy not really getting the full benefits of the bike. You’ll be bottoming out a lot on stuff you really shouldn't bottom out on and if you have not enough sag, meaning your suspension isn't going into the travel far enough, you'll be kind of harsh, you'll never be bottoming out if you're riding steep stuff, your rear shock won't be sitting into the bike, you'll be constantly kind of feeling like you're going over the bars and that won't create confidence. So getting the sag on both the front and rear and the balance is really important. So tools you will need is some type of measuring device. I have a ruler here, I have a pair of micrometer calipers here and a tape measure. Any of them work but make sure you're just kind of keeping it consistent and measuring with the same tool every time you set up sag. Alright, so we're going to start with the rear shock and once we get the rear shock sag we're going to look for 30 percent per Yeti’s manufacturer recommendations. We're looking for about 18 millimeters of stroke on this shock for sag, that's about 30 so also on the Yeti setup guide that puts me in about 152 psi for this rear shock and that's what we're going to go to to start out for our sag.
152 right there. Anytime you're adding or removing pressure from a front and rear shock you're going to want to equalize the positive and negative air chambers. By doing so you just push down the shock a little bit, and there's a transfer port and that'll help equalize both chambers. Alright,so we're going to measure our sag on a rear shock, you're going to want to find something solid to lean up against. If you're sitting on your own, if you have a buddy have him hold you up, but I'm on my own here so I'll be using this wall and uh yeah, we'll get on it. I actually need pedals on this bike. Adam, can you bring me pedals?
So you sit down, give the bike a couple bounces.
And then I’m gonna sit down and then you reset your o-ring, so push this o-ring all the way back against the shock seal and then you're going to want to gently get off without adding too much movement to the bike. Sitting for me I can just easily hop off and now I have my sag. Now I'm going to measure this sag. I have my micrometer set 18 millimeters which is the 30 for this rear shock, so we come in here and we're exactly at that 18 millimeters, so that's the perfect amount of sag per Yeti’s recommendations. Now we'll move on to setting the sag on the fork.
Same thing as the rear shock except we're going to be measuring it in a different millimeters because it has 170 mm of travel so per Fox's recommendations on the fork for about 15% of sag, we're going to be looking at 26 millimeters of sag or if we're looking at 20% of sag we're going to be looking at 34 millimeters of sag. I know that's confusing, I'll explain it in a little bit. So also per Fox’s recommendations and Yeti’s, I'm going to be looking right around 82 to 84 psi on this front fork and that should give me about that 20% sag number that I’m looking for on this bike. Alright so attach the shock pump and we're looking for 82, 84 psi.
So 82.5 but remember we need to equalize the positive and negative chambers on this, so give it a couple pushes, nice and slow. So we're 83 psi, just in between that 82 and 84 that Fox recommended, so we'll pop off the shock pump and give it a measure. Alright, so now that we have the pressure set we're going to be measuring sag the same way we did on the rear shock but on the fork. Now hop on the bike, get up against something stable.
Let off the brakes, there's a pro tip. Let off the brakes when you're setting sag, give it a couple bounces and sit down. Because I’m sitting the same every time, push down the o-ring and then gently, without pressure, jump off the bike and grab this guy.
Alright, so now we're looking for about 26 to 34%. I'm actually running it right around 28 millimeters on this guy and that's going to put me right around 18 or so on fork sag and I’m right at that on my 83 psi. So now we have sag set front rear, it's time to move on to rebound settings and why that's important.
Setting up rebound you can tell we have it too slow right here. It takes a long time to return. You want it pretty much as fast as possible without the rear wheel kind of bouncing off the ground, so if i open it up all the way, it's all the way closed right now, which is slow. If I go all the way open, which is going to be super fast, the rear wheel will probably bounce up and down.
So as you can tell, that's too fast, that'll buck you off chumps. So we're going to find the middle ground and for myself on the rear shock pressure that I have, the high speed rebound and a low speed rebound is going to be a little different and we'll find out what that number is once we get to them. Alright, so based on the Yeti website recommendations as well as the Fox recommendations for 152 rear psi that I’m on, my low speed rebound, which is this adjustment here on the X2, I want to be 14 clicks out from fully closed. So that's a little bit of a confusing topic on compression and rebound. So you're counting clicks from fully closed always. That's what I do and the same thing you just want to make sure you're consistent, so fully closed is clockwise like you're screwing the bolt all the way into the shock. So we're fully closed right here and we want to count out 14 clicks so that's one.
Alright, so 14 clicks out, that should be about my starting point for my low speed rebound and as you can tell that's a pretty good middle ground for this psi. So this particular float X2 shock actually has a high speed rebound and a low speed rebound adjustment. We will now be adjusting the high speed rebound adjustment right here. Most shocks will actually only have one rebound adjustment, so it'll be the same setup but you'll only be moving one of the red knobs and not two, but for the float X2 for the Yeti setup I want to be four clicks out from closed. So we're at fully closed right now, so I want to count out four clicks just like that and what high speed rebound does is it helps control kind of the end stroke rebound, so on big hits or harder jumps when you're kind of getting into the bike in the travel more it allows it to not return so fast and kind of keeps you controlled. Low speed handles the lower velocity hits while high speed rebound is the higher velocity hits. So low speed slow and normal stuff. High speed big hard hits, big heart G-outs and kind of, you know, something you might want to go on a slightly slower side so you don't get bucked out of control on a big landing.
So going to adjust the rebound on the fork, same thing as the rear shock except the fork rebound is going to be in the bottom of the fork and we're looking for the same thing. So based on Fox’s recommendations I want to be eight clicks out on my high speed rebound and nine clicks out on my low speed rebound and the Fox fork with a GRIP 2 damper does have that high speed, low speed. If you're using a GRIP damper or a Rockshox or any other brand you usually only have one rebound adjustment, so it'll be the same thing. They’ll be moving one knob instead of two knobs and they're actually labeled now. So if you have a first-gen GRIP 2, they might not be labeled but they are labeled down so our high speed rebound is this top, larger knob and our low speed is this bottom knob. So my high speed rebound I want to be eight clicks out from fully closed so i'm going to fully close down high speed so both knobs turn together. Don’t worry about that, we'll just move this high speed knob and the low will go with it so fully closed eight clicks out.
And there's eight. Same thing with the low speed, we'll close this all the way down see how they they move independently. Now two different circuits, so low speed’s all the way closed and we'll go nine out on this. Alright, so now I'm eight and nine and that should be a really good starting point as well. And again these are all starting points and we're just getting the basics down so go ahead and put your cap back on. So now that we've done the adjustment you can give it a quick test and just be mindful this is not a good test but you can just see, kind of, if you're close in the range so give it a couple compressions.
And from my first feeling of that on what they said, it's a touch fast but I would give that a first try at the baseline settings before you make any adjustments and then you can go into adjusting stuff and slowing it down and especially on this GRIP 2 damper. Only do one click at a time if you do happen to make any rebound or compression adjustment changes, but for now we're going to leave that as far as the basic setup goes and we'll move on to compression settings why it's important and how we're going to adjust them.
Alright, so jumping into compression. So compression is an adjustment that controls how fast your shaft speed moves. So while air pressure controls where you sit on the bike as well as your air ramp up, compression does shaft speed. So on this rear shock we have a Fox X2, we have a high speed compression and a low speed compression. Again, similar to rebound, your high speed compression is for bigger hits, square edge hits, rock gardens, really stuff that's kind of coming up on the trail fast where low speed is a little bit more like rollers, berms, kind of when you're sitting on the bike. So you have two adjustments and we're going to adjust both of them according to the Yeti settings on the Fox X2. So on your Float X2 rear shock you have a high speed adjustment and a low speed adjustment. Your high speed is going to be controlled and adjusted by the 6 mm Allen while your low speed is going to be inside of there and controlled by your 3 mm Allen. I know in my high speed compression adjustment I’m looking at five clicks out from fully closed. So I'm going to close down my 6 mm. Alright, so I’m fully closed there and I want to be five out. Alright so 5 out there on my high speed and I want to be 12 out on my low speed, so we'll close this all the way down and we'll back it out 12 clicks.
And there's 12. So that should be a pretty good starting base point on my rear shock for compression settings. Now let's go do compression settings on the fork.
Alright, so our fork compression settings are very similar and on the Fox GRIP 2 damper we have a high speed which is the blue knob and the low speed which is a black knob. Again, when you turn the high speed, the low speed also moves but when you turn the low speed the high speed does not, so we're going to come in and make my adjustment. I know if I'm already looking at the setup guide I want to be 7 out on my high speed and 12 out on my low speed, so I’m going to fully close down my high speed and back it out 7 clicks and on my low speed I want to do the same and then close it all the way down and back it out 12.
Alright, so now we did both our high speed and our low speed adjustment and now we're ready to give it a little test. We'll move on to kind of the final tips and tricks that we'll address with sag. So now you've gone through sag setup, rebound setup, and compression setup. Now you're ready to go give it a test ride and see if you're kind of close. It feels great, or you may be a little bit far away and you need to make some adjustments. The first thing you want to do is go to a trail near your home or you know where you normally ride and hit a section of trail that you know well and is easily repeatable and you can kind of do laps. It might have a little bit of turns, drops, rocks, jumps, whatever. Main thing is just to do it consistently every time with the same amount of effort. The next thing you want to do is bring a little notepad so every time you make an adjustment to the compression, the rebound, or bring a shock pump and change the psi, take a little note down. Make sure you know which way you're going and what adjustment you made. That way you know if it felt better or worse. You can always go back to the previous setting.
Some more tips you want to do is always keep your suspension clean after rides, so clean suspension is happy suspension. After every ride, you just kind of want to go through, grab a clean microfiber towel, and kind of wipe down the stanchions and the seals. By doing so, you'll keep everything moving kind of really smoothly. Keep the dust from getting too far in those seals and it'll actually help your suspension last longer. So anytime you kind of get lost on your suspension adjustment, you maybe turned too many dials one way or you can't get all your travel, just restart. Just go back to the beginning of this video, restart and kind of do it all over again. And I can't stress enough, make some notes. Always bring a notepad with you, keep one in your car, keep one in your riding pack. This is kind of your field notes and it's gonna be your helpful starting guide and six months from now if your suspension doesn't feel good or you get it serviced and they happen to change your settings, you have a reference on where you were and you don't have to fully restart. So let us know in the comments what you liked about this video, what we could include, and on the next video we'll be diving much deeper into bracketing, volume tokens, and kind of advanced suspension setup tips.
© 2026 Worldwide Cyclery


