- Continue Shopping
- Your Cart is Empty
How to Upgrade Your Mountain Bike Fork - Everything You Need to Know [Video]
How To Upgrade Your Mountain Bike Fork:
The fork on your mountain bike has a few important jobs. First, it holds the front wheel and helps you steer the bike, helps you hit rough sections easier and keeps you in control allowing you to ride smoother and faster. So when it comes to upgrading your fork on your mountain bike, the choice of what fork to buy is very important. As with most things in the bike industry, there are a huge amount of options and also within those options, there are size variants that you need to make sure are compatible with your current bikes specifications. In this article, we are going to help guide you to the correct fork for your bike. Stick around and maybe you will learn a thing or two!
Wheel Size:
The first thing you need to find out is the wheel size of your front wheel. This is something you don't want to change and make sure is right. For the most part you will have 3 sizes, 26, 27.5, and 29” wheel options. Pretty simple. The only odd one would be a 27.5 plus fork. For this, you would use a 29” fork as the larger tire needs the extra clearance. Once you get your wheel size you can narrow down your search for forks quite a bit.
Steerer Tube Type:
Next is finding your steerer tube type. There are mainly two options for current modern mountain bikes. The majority of bikes these days have a “Tapered Steerer Tube” meaning the bottom is a larger diameter than the top, a 1 ½” bottom to a 1 ⅛” upper. If your bike does have this, that is great as you will have the most amount of upgradeable options to choose from. The next most common is an 1 ⅛” straight steerer tube, the same diameter from fork crown up to the top. While becoming less and less common, there are still options out there. It's sometimes possible to have a straight steerer bike and get a larger lower diameter headset cup so you can then make your bike a tapered headtube. While not always possible, it's worth checking out if you are looking to upgrade your fork for some serious performance improvements This is best done by doing some research and if you need some help, contact our customer service team.
Much less common and a bit old school, are threaded steerer tubes. Found on older bikes, these are pretty much impossible to find.. If you are looking to upgrade your fork on a bike that has a threaded steerer tube, it's possible you can buy a new headset for your frame and get a threadless straight steerer fork for that bike. But at that point, unless there is some emotional connection with that bike, it's likely outdated and might not be worth putting much money into.
Fork Travel:
The travel of your suspension fork is an important part to consider as well. This is one of the first options you have to change and possibly get “more” out of your front end.
Start with finding out what travel your current fork has. Once you know that (for this example let's use a 150mm travel fork). You can get a new 150mm travel fork without any issues, same travel, works great, you are not changing anything, simple. But… this is where you can adjust what your bike does a little bit and make it better suited for you.
If the bike has 150mm travel stock, you can easily up the travel 10mm, to a 160mm fork. This is a safe amount of travel to change, going up 10mm in travel doesn't change much, gives you a little more suspension to use, and normally it slackens your headtube angle about .4 or .5 degrees.
On some bikes you can bump up travel 20mm, from 150mm to 170mm, while that starts to change the original geometry of the bike, most of the time it's still a pretty safe amount to change, slackening your bike about .8 - 1 degree, the bigger change is how much it might raise your bottom bracket height. New bikes bottom bracket heights are pretty low and will still ride correctly with that much change, but it's something to consider.
Less common, is dropping your travel down 10mm. Sometimes people do this to steepen the headtube angle, shorten the wheelbase, or just have a lower front end. Dropping 10mm will do the same but it will steepen your headtube angle about .4 degrees, but it will also drop your bottom bracket height as well. As I mentioned, if you have a more modern mountain bike it's likely that your bottom bracket height is close to as low as it can be and if you are already pedal striking rocks often, this might not be the best choice for your bike. I did just see a bike check with Connor Fearon where he dropped his fork's travel from 170mm to 160mm on his Kona to better suit his local trails and make it more of a comfortable trail bike. So while it's not as common as “over forking” your bike, you still see it happen from time to time.
Axle Type:
More options, are you ready to keep narrowing down your search? Axle type is very important because if you get this wrong your front wheel will not work. The most common axle types are: Quick Release or QR also known as 9 x 100QR, then you have Thru Axles like 15 x 100, 15 x 110mm Boost, as well as 20mm x 100mm and 20mm x 110mm Boost. Yes, lots of options but let us help you out.
Quick release axles are common on older or entry level bikes, this is the classic type of front axle. You have a lever that you open up and then normally have to unscrew it a bit to take off the front wheel. While it's been used for a long time, it's a bit flexy, inaccurate, and generally not amazing.
Next, you have thru axles. First introduced on dh bikes, but now it's common for all new modern mountain bikes to use this type of axle. A few years ago that standard was 15mm axle x 100mm width, until we changed that. Now, Boost Spacing is the most common. That is 15mm axle x 110mm width, adding 10mm do your front axle.
So, if you currently have 15x100mm spacing and are looking to get a new fork, it's a good idea to just get a boost fork with 15x110mm spacing, and you can get some hub adaptors to take up that extra 10mm, 5mm on each side. That way your fork is more “future proof”, which helps in this constantly changing industry. If you have a fork with a QR front axle, you most likely need to stick with that style of front axle to match your wheel.
However, some wheels, (Stans, maybe Chris King, Hope Tech, DT Swiss, you can get a new axle or end caps so you can make your hub from QR to Thru Axle, but best to contact an expert to know 100%), or you can also get a new front wheel at the same time. If you do this, you can get a front wheel with whatever spacing you want, and match your fork to that spacing as well, which is a more expensive route, but could be worth it if you are willing to spend that type of money on your current bike.
The other types of axles I talked about are more for older style trail and freeride bikes, some dirt jumpers as well, but most commonly for Downhill bikes. Current downhill bikes still use a 20mm axle and recently a 20mm x 110mm boost has been introduced as well. If you are looking to upgrade your fork with a 20mm axle, you might have a hard time finding anything that isn't a dual crown fork, as most trail bikes have moved to the 15mm axle standard.
Brake Mount:
More confusion on brake mounts? We got you covered. If you haven't figured it all out yet, one of the last bits you need to know is your brake mount type. Modern bikes use what is called a post mount brake mount, meaning in many cases the disc brake caliper mounts directly to the fork with some bolts, no adaptors needed. This is the most clean and easy brake type.
All post mount forks are not created equal however. It was common for all forks to have a 160mm rotor post mount, so if you had a 160mm rotor you could bolt the caliper to the fork and it will work great. That was a few years ago and if you have noticed a theme, things change… a lot. It has become much more common for trail bike forks to have a 180mm post mount rotor size on the fork, all top level RockShox forks are 180mm post mount with the exception of the new ZEB and the 100mm SID SL fork. The ZEB has a 200mm post mount while the SID SL has a 160mm post mount.
The mid range to entry level forks will most likely have a 160mm post mount. If you have a 180mm rotor but are buying a 160mm post mount fork, you will need an adaptor so your caliper can mount and make contact at the correct spot on your disc rotor.
Older style disc brake forks have what is called an “IS” mount. IS mounts are holes drilled into the fork, this is almost not seen on any modern forks, but was more common on older forks. If you have an “IS” mount, you will always need an adapter to mount your disc caliper as the holes are perpendicular to the mounting holes on the caliper.
If your bike uses v-brakes, or rim brakes, your options might be more limited. While you can still get some suspension forks with this brake type, it's common that the fork will also be straight steerer and qr axle.
Fork Offset:
You can pretty much get all your specs down with the above sections and can probably find a fork that works with all that info. But, one of the last specs that might be important for you to look into is fork offset.
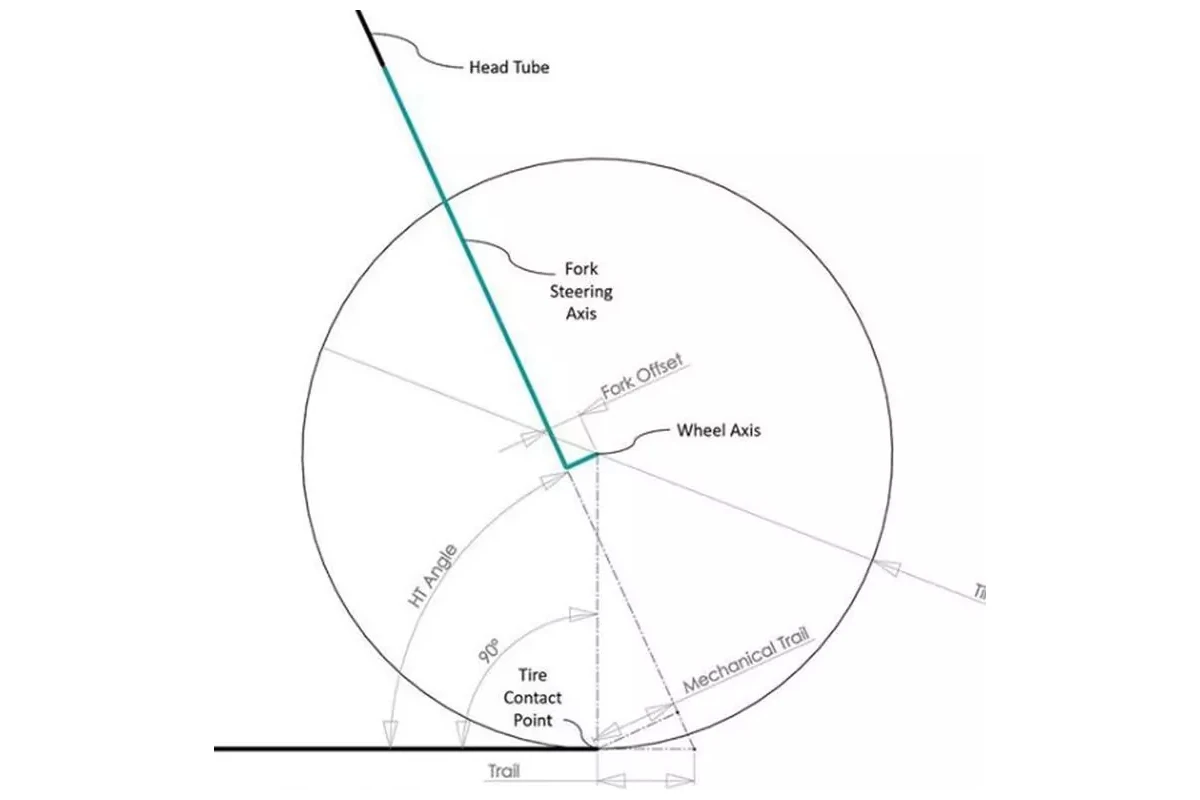
Fork offset is the distance between your steerer tube on your fork and where your front wheel axle mounts. I'm not going to explain what fork offset does as that is a whole topic on its own, one which we explained in our video on Fork Offset Explained.
For the most part, you want to match your forks offset with the stock spec of your bike. So if your fork is 51mm offset, find a 51mm offset. Recently offset became more of an option with how some new modern bikes are getting longer and slacker, changing the offset helps your bike handle better.
So if you read our fork offset explained blog and think you want to change what your bike has, great, look for a longer or more reduced option. But if you don't know or can't find the exact offset your bike has, it's likely not going to feel much different and I'd just find the fork you can afford and go that route.
Air vs. Coil??:
Air VS Coil, the debate that still goes on everyday. When you are looking to upgrade your suspension fork, it's likely you will be looking at an Air fork. They are more adjustable, feel smoother most of the time, and normally they are the upgrade option. If you currently have a lower end coil fork, an air fork will make a huge improvement. Now, there are a few coil forks coming back to life in the mid-high end range, like MRP Ribbon Coil, CaneCreek Helm Coil, and the new Marzocchi Z1 Coil fork, are new coil options if you want a set it and forget it fork. If you are also looking to maybe turn your mid-high end fork into a coil fork, you can look at Push Industries ACS-3 coil insert kit.
How Much Should You Spend?:
The last thing to consider is how much do you want to spend? This is hard to answer as it depends on your budget, riding amount, style, as well as what bike you are putting it on.
If you are upgrading a bike that is more than 10 years old, it's likely that you might want to think about even making those upgrades. For a little bit more money, you can often get a more modern mountain bike that has newer standards and geometry.
If you have a bike that is only a few years old, it's very likely you can make some upgrades that will work for your bike and might be future proof as well if you wanted to upgrade other parts as well. It also depends what you are looking for in your fork upgrade. Do you want a better feel, more travel, more adjustments, or lighter weight? Those are all things you should consider when looking at new forks.
Generally, the more money you spend you get better performance, in trail and XC forks you get a lighter weight fork and a better feel, on trail/enduro forks you normally get better performance, stiffer chassis, and more adjustments.
So are you the type of rider that needs any of those things? Then you might want to look at the upper midrange to high end forks. If you just want something that feels a bit better than you can probably look around the entry level - mid range type of forks.
Final Thoughts:
Wow, that is a lot of information to digest and think about. Upgrading your fork can get you some major performance improvement but it’s important to understand the right model for your bike. Also consider things like your bike's age, and how much it's worth to you. Then look at Wheel Size, Axle Type, Steerer Tube Type, Travel amount, Brake Mount type, and fork offset. With so much to consider, it's a great option to contact our customer service team, the experts at Worldwide Cyclery are here to help you get the correct fork on your bike, maybe give you some options to choose from and get you the best fork for your bike.
If you're one strange human and would like to read the transcript of the video above, continue reading below!
hello mountain bike friends a little over two years ago we made a video about all of the things you need to consider when you are upgrading the fork on your mountain bike it's one of the most common upgrades there is but there is a lot of complexity there in terms of steer tube wheel size axle brake mounts all of that sort of stuff we're going to cover everything you need to know in this video to upgrade the fork on your mountain bike
Jeremy christmas! forks! [Music]
so in this video we are going to talk about all the things to consider when upgrading the entire fork on your bike obviously when you say upgrade your fork that could mean upgrading your air spring or your damper something like that that's not going to be in this video that's a little bit more technical on really high end mountain bike forks you can do things like upgrade your damper or your air spring or add tokens or things like that which could be considered an upgrade push industries make some really cool high-end upgrade dampers for very expensive forks but in this video we're going to talk about the things to consider when you're upgrading the entire fork on your mountain bike we're going to go over steer tube type wheel size offset axle brake mount and everything else so you can see right now the time stamps on the screen if you want to pan around and get to a point where you need or you can just watch the whole thing if you want to learn all about this let's jump into it [Music] the first thing we're going to talk about is steerer tubes you do have to get all of these things we're going to talk about in this video correct in order to make sure the fork you buy fits your bike but one of the key elements there that we're going to talk about first is steer tubes most modern mountain bikes all have what's called a tapered steerer tube and what that means is that the bottom is a 1.5 inch and the top is an inch and an eighth tapered so again this is the absolute most common that there is on modern day mountain bikes there of course is on a little bit older bikes or let's say cross country bikes with a steel frame or something a straight steerer which means it's an inch and an eighth all the way through like this less common but again very important to know which one you have so it fits your bike on much older bikes you can get into things that are like threaded steers jared bring in an example this is a giant sedona it has a threaded inch there's an at one point there was an inch threaded then there was an inch and an eight threaded then there was an inch and a threadless this is a quill stem if your bike has that i don't recommend upgrading your fork you should probably just ride it as it is have a great time save some cash for a whole new bike that's deer tubes help me help
[Music] you next thing here is travel um this is a very important thing to talk about travel for your bike you're basically the manufacturer of your bike specifically engineered your frame to work perfectly with a certain travel fork which means you should probably stick with that because a lot of engineers spent a lot of time designing that frame around that travel fork you can of course go a little lower or a little higher we do not recommend going more than 20 millimeters in either direction so that means if you've got a hardtail with a 100 millimeter travel fork don't go any lower than an 80mm travel don't go any more than 120 ml travel if your bike is designed for a certain travel fork and you go lower you're gonna steepen the head angle lower the bottom bracket lower the whole front end of the thing and that's going to give you a very different feel and vice versa if you go more if you add travel to what your bike is intended for it's going to lift that bottom bracket lift the whole front end of the bike and slacken out that front end front head angle so it will change how your bike works if you change the travel of your fork so definitely something to consider but again we really really do not recommend going more than 20 millimeters away either direction from what your bike was intended to use initially so keep that in mind every bike you know sort of is designed around a specific travel fork it's pretty easy to figure out you probably already have one on your bike or you can figure out pretty quickly from the manufacturer's website what bike brand you have what it's designed for there's obviously a ton of different travel forks out there all the way from 80 and 100 millimeter ultra light cross country forks like this thing to your 170 millimeter 38 mil stanchion beautiful super enduro forks to your 200 millimeter travel dual crown forks which are pretty much exclusively made for downhill bikes typically the front fork travel is going to match the rear travel on the rear end or be close to it you don't really see a huge amount of variation there again the biggest thing to keep in mind is what was that frame engineered for initially those manufacturers those engineers hopefully know what they're doing and they designed it right so don't go too far away from that that's travel
another key element to consider when upgrading the fork on your bike is what wheel size are you looking for so you want to get a fork that corresponds to the wheel size that you have on your bike for instance if you have a 26 inch wheel bike you want to go with the 26 inch wheel fork if you have a 27.5 inch wheel bike you want to get a 27.5 inch wheel fork but if you have a 27.5 plus bike you probably want to get a 27.5 plus slash 29 fork and that'll do the job for you but basically when you're looking at forks you just want to go with the fork that corresponds to the wheel size on your bike and then you'll be set
okay the next thing to consider is offset this is typically specified in the product title and in the description of any fork you're looking to buy offset wasn't really a thing until maybe a decade ago gary fisher actually came out with what they called there i believe it was g2 geometry and they pretty much just changed the offset of a fork on their 29-inch wheeled bikes when 29ers were just becoming a thing basically to make that offset work better for the larger wheel and the geometry of that bike since then it's continued to evolve different brands have designed bikes around different offsets and now forks are offered in different offsets it finally seems like bike brands are settling on what offset they want to use and what works best for 29 and 27.5 um but who knows we'll see it could change in a couple years we made a whole video called fork offset explained sort of detailing how the offset actually changes the handling of the bikes and we also wrote an article as well that showed like detailed images of how when you change the offset of a fork the trail changes and sort of the steering dynamics of the front wheel change as the offset changes but nonetheless like most things we've said in this video get the offset that your bike was engineered around so if your bike was engineered around a 51 mil offset go with that if it was engineered around a 44 millimeter offset go with that it's not necessarily something you want to mess with when it comes to if your bike was designed for a certain offset you should very likely just stick to it so keep that in mind and again most modern day mountain bikes because offsets become a much more real thing in terms of a fork attribute in the last couple years the brands will specify what offset you need hopefully on the model page of the bike that you have and then you can just upgrade your fork and get that so don't worry too much about going away from what your bike was designed for when you're upgrading your fork it's much more about weight performance adjustments feel all of that sort of stuff and then matching sort of the attributes that that bike was engineered for so there you go that's offset [Music]
okay next up is the axle on your fork this is a very important thing to also get right i wish i could say there are some common types or ones the most common but there really isn't i think probably the most common on modern mountain bikes these days is the 15 by 110 what's called a boost axle so mountain bikes originally had a quick release also known as like a nine millimeter axle um that's not a thru axle then it went to a thru axle just regular 15 millimeter by 100 then it went to 15 by 110 boost and that's probably the most common but there is also uh 20 millimeter axles for downhill bikes 20 by 100 and there's also a 20 millimeter boost axle but that's really rare um again pay attention to what axle you have most of the forks that you see laying all these forks are through axles right here and you do need to measure your hub and figure that stuff out if you want to see what a quick release axle look like that's on a little bit older bikes that's these babies right here so you could basically upgrade your fork and use a different axle standard than like what's used on there currently but you're going to have to either use adapters to modify your existing hub to get to that standard or use different front hub or front wheel as soon as jeff gets this front wheel off yeah so this is a quick release right here they're a bit older they're really flexy and there's a reason that they don't exist on high-end modern mountain bikes these days and through axles do exist so if you do have a bike with a qr axle and you're upgrading your fork two things to consider one should i upgrade the entire bike if no it's still a good frame then the next one is should i upgrade to a fork with a thru axle and then do i get an entire new front wheel an entire new wheel set or do they have available hub adapter kits for your hub may or may not happen but it is very common a lot of people run into this problem and we help people out with that situation all the time right jared that's true yeah give us a call shoot us an email ask us any questions you got
all right last but not least brake mounts this is another really important thing to figure out so your bike right now has some type of brake mounted to it if you've got a more modern high-end mountain bike it very likely has a post mount so what that means it looks like this it means that your brake caliper adapts to the fork with just two bolts that go directly into the fork right here this is a post mount these are not all created equal so most most post mounts on shorter travel forks let's say 80 to 140 mil are a 160 post mount meaning you can put a caliper on here and a 160 rotor and you need no adapter however if this is a 160 post mount for example because this particular fork is a cross country fork if you wanted to put 180 mil rotor on here um you would need a 20 millimeter adapter so keep that in mind now longer travel forks like that fox 38 right there it's got a post mount 180 or post mat 200 180 post mount 180 which means that 180 millimeter rotor goes on there and the brake caliper mounts on there no adapter again if you wanted a 200 ml rotor you need a 20 mil adapter so that's how that works figure out which post mount you have if you have post mount some of the other common types are well i don't really think they're any common post mount is the most common now years back they made what was called an is mount which is what this old guy has here that's where you have basically two bolts that go perpendicular into your adapter which goes like that then your caliper mounts to it wasn't the best design that's why they kind of got rid of it and now everything went post mount and then of course depending on the price range of your bike you might have caliper or v brakes which is what this bike has and you have mounts right here so if you do have caliper or v brakes obviously and you want to keep those brakes you got to do that or if you want to get a bike with that doesn't have those a fork without those then you need to get disc brakes and yeah a lot of things to consider here so uh hopefully that all made sense
[Music] the very last thing we have is how much should you spend in air verse coils so if you're looking at upgrading your fork there is a ton of options out there and a ton of price points we've made videos on a ton of the higher end forks we've also made a video on the best forks that you can upgrade to that are under 500 and they do change a lot so typically under 300 bucks you're going to see a lot more coil forks they're obviously going to be heavier and they're going to have less adjustments so as you sort of go up the food chain and in the price range of mountain bike suspension forks you're typically going to see them get lighter fancier in terms of more adjustments and looks and all of that sort of stuff and yeah there there could be a little bit of complexity when it comes to adjustments and which ones are necessary and which ones are not necessary but adjustments and those kind of features really do pile up on you as you get towards the higher end segment of forks and the weight typically goes down which is really cool forks have come a long way so it's definitely something to consider air versus coil that really does depend on riding style so almost everything now are air forks even a lot of downhill forks and super enduro forks up to 180 millimeters of travel like the fox 38 or air forks um coil is actually pretty common on um sort of like free ride and dirt gem forks and lesser expensive forks but mrp makes a really cool coil coil fork as well because coil is claimed to have some really interesting sensitivity features but every time coil gets really good with sensitivity the air springs kind of catch up to that sort of feature set but anyways that's that we have a lot of other videos on suspension forks comparing the different top brands and all that other stuff so check that stuff out link below in the video description thank you guys for watching hit that subscribe button and we'll see you in the next one.


