- Continue Shopping
- Your Cart is Empty


How To: 7 Tips for Aligning Your Disc Brake Calipers
Whether you are assembling your new bike for the first time, installing a new set of brakes, or doing a brake service, it's important to align your disc brake calipers over the rotors so that the friction surfaces on the rotor and brake pad are parallel to each other. In this mountain bike How To, we are going through a few quick tricks for aligning your brake calipers. No one wants to be riding their bike and constantly be listening to your brake rotors rubbing as your wheels are turning. Not only is that noisy, but if your rotors are rubbing, your wheels won't be spinning as freely, you might not be getting 100% of the available power from your brakes, and the brake lever feel might be a bit spongey. Here are some tips and tricks to make properly aligning your brake calipers a little bit easier.

Sram G2 Ultimate brakes with the titanium rainbow hardware is worth drooling over
First you want to make sure your rotor isn't bent. All rotors can be slightly bent, even sometimes straight out of the box. If you have crashed and bent your rotor so bad that the wheel won't even spin through the caliper, your best bet is to start by getting a new rotor.
When it comes time to servicing your brakes, nine times out of ten, you will have to recenter the brake caliper on the rotor so that the wheel and rotor are spinning freely. When it's time to replace brake pads, it's also a great time to do a complete brake bleed, giving you the chance to depress the pistons inside the caliper as much as possible. As your brake pads wear over time, the pistons in the caliper naturally advance to keep the friction surface of the pads the same distance from either side of the rotor. If you were to do nothing but change the brake pads, the new "thicker" pads would be constantly rubbing on the rotor making it next to impossible for the rotor to spin freely inside the caliper. Depressing the pistons will give you the most space possible inside the caliper, making it easier to align the caliper centered over the rotor.
For more info on bleeding brakes, check out a few of our other How To's on bleeding Shimano Brakes and bleeding Sram brakes.
What Tools Do We Need?
To properly align your brake calipers, you really don't need many tools. There are certainly some tools out there that can make this process a little bit quicker and easier but with a set of hex keys, anything is possible! We are going to use a couple of different techniques with a set of hex keys, a Park Tool DT-2 disc truing tool, and a Hayes caliper alignment tool. Most commonly brake caliper bolts use a 4mm or 5mm hex key head and so even a standard multi tool could get the job done.

1. Put Your Bike in the Stand
The best way to work on your bike is always in a bike stand. When it comes to working on your brakes, having the bike in a stand will allow you to spin the wheels freely. A lot of aligning your brake calipers comes down to having a good line of sight down through the caliper. Having your bike in the stand does just that. If you don't have a stand, flipping your bike upside down will also work.

2. Use a Light Colored Backdrop - I'll Explain!
Being able to have a clear line of sight down through the brake caliper will make it much easier to diagnose exactly which part of the rotor is contacting with the brake pads. When you have your bike in the stand, set the height of the stand so you can look down at the rear brake caliper. I am working on a concrete floor that has just recently been cleaned and so the color of the concrete is relatively bright. That light colored backdrop gives you contrast between the brake caliper and your backdrop, making it easier to see the gap between the brake pads and the rotor. Trying to align your brake calipers either in the dark or with a very dark backdrop like asphalt for example is a bit more difficult. If you are stuck with a dark floor or a dark backdrop, you can place something as simple as a white paper towel behind your line of sight. This is a simple trick that can help keep you from running in circles trying to align those calipers. In the two photos below, you can see the difference between the lighter colored backdrop and what happens when you put something dark behind your line of sight.


3. Backing Out the Brake Caliper Bolts 1 Turn
Now that you have everything set up and ready to go, it's time to mount your brake calipers and get them aligned correctly. First I like to run the brake caliper hardware all the way bottomed out and then backed out 1 full turn. This will make it easier to tighten the caliper bolts once you do have the caliper in the right spot. Also make sure you are using caliper bolts with a washer on the bolt head. Without that washer, when you tighten down the caliper, the caliper will tend to walk towards the direction the bolt is turning.

4. Squeeze the Brake Lever to Center the Caliper
With the brake caliper bolts loosened just slightly, you should be able to move the caliper around by hand to make sure it isn't getting hung up on anything. Now you can go ahead and squeeze the brake lever and continue to hold that lever as you tighten down the caliper bolts. There is no need to tighten those caliper bolts too much at this point. Next spin the wheel in the stand to see if the rotor is rubbing at all with the brake pads. Depending on how well each of the pistons are moving, this may be just the first attempt at aligning the calipers. Most of the time the caliper will require a bit more finesse after this step, but using this method to center the caliper is a good starting place.

5. Using a Caliper Alignment Tool
Using a dedicated caliper alignment tool is defenitely optional, and even though I have one of these tools in my toolbox, 9 times out of 10 I prefer to align the caliper by hand. When the time comes, using the Hayes alignment tool can be very helpful. If you completed the step above without any luck and the rotor was rubbing really bad with the brake pads, don't be afraid to loosen the caliper bolts and try again. Here we are going to place the alignment tool in between each side of the rotor and the caliper. What this tool does is it leaves a certain amount space on each side of the rotor. Tighten the caliper bolts down evenly with the alignment tool installed. Then remove the tool and see if the rotor is rubbing.


6. Center the Caliper by Hand
When it comes down to it, sometimes the best method is just aligning the brake caliper by hand. Make sure you have a good line of sight through the caliper and try to center the caliper so that the rotor isn't rubbing on the pads. When it's time to tighten each of the caliper bolts, tighten each caliper bolt a little bit at a time. Torquing one caliper bolt all the way down while the other is still loose can cause the caliper to mover over to one side. This is sort of a rinse and repeat method. When you get close, you can also work with just one caliper bolt at a time. That way you aren't starting from scratch each time the pads and rotors are rubbing.
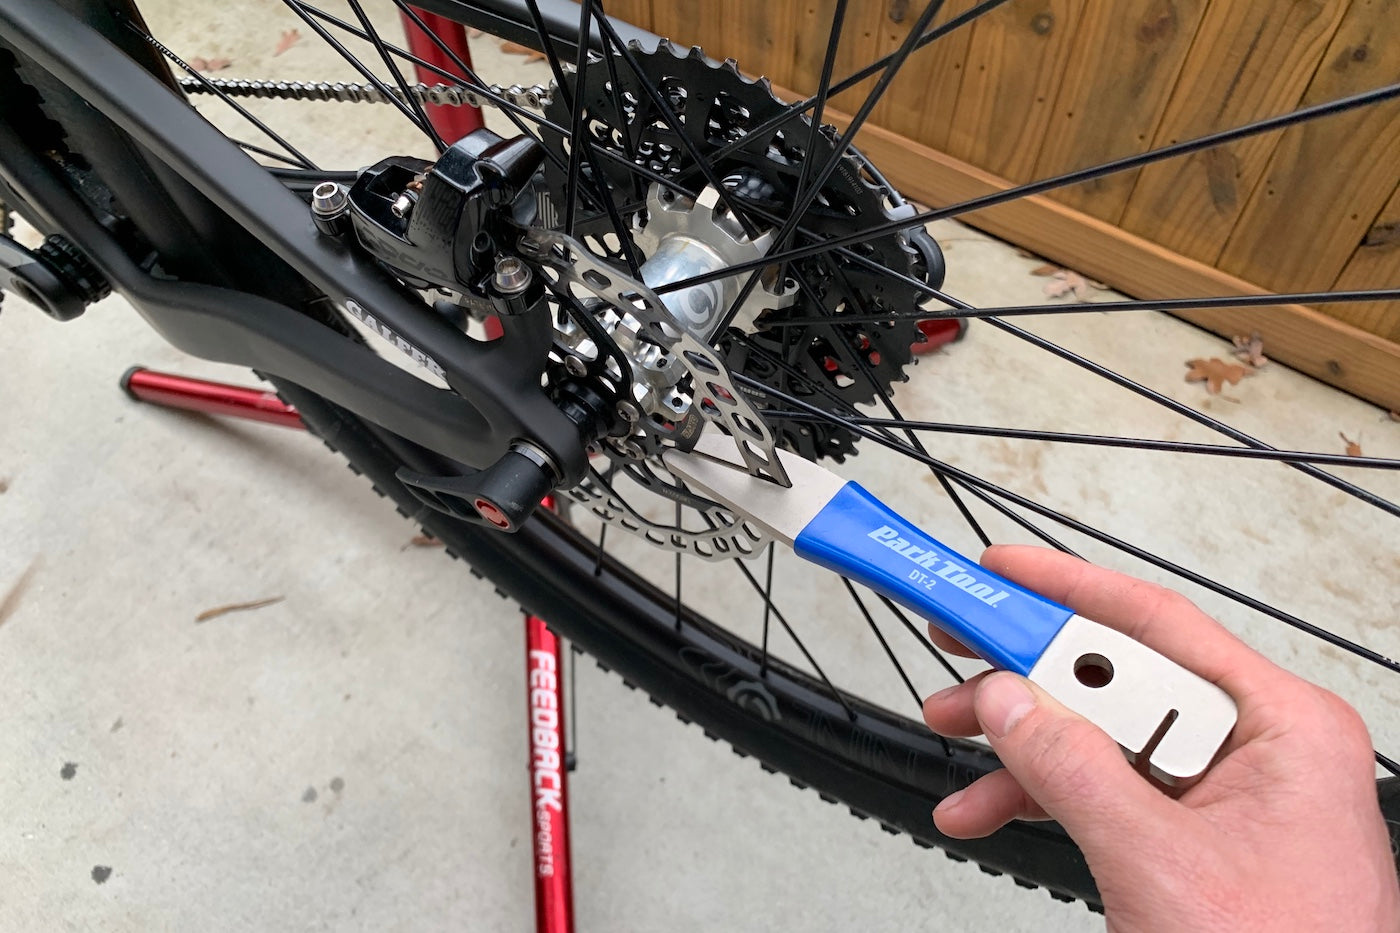
7. Bending the Rotor Straight
Some times the rotor can be slightly bent and centering the caliper is next to impossible without straightening the rotor first. This is where the Park Tool DT-2 rotor truing tool comes in to play. The DT-2 features two different slits for two different ways to straighten the rotor. When you are spinning the rotor through the wheel, listen for where the rotor is contacting the brake pads. Then spin the wheel so that the bent portion of the rotor is away from the caliper. Using the DT-2 tool up close to the caliper can put a kink in the rotor if you aren't careful. Straightening the rotor is a last ditch effort to centering the caliper. Most of the time it's not necessary but when it is, this specifically designed tool from Park Tool comes in handy.
Hopefully, these tips and tricks make life a little bit easier when it comes time to working on your disc brakes. Feel free to give us a call at the shop if you have any other questions!

© 2026 Worldwide Cyclery


